Photography can be an exciting and creative hobby, but it's also great to see the world around you through a new lens. However, indoor photography can seem daunting if you're starting on your photography journey, especially if you're planning to photograph people.
To make every pixel in your indoor image clear, it's essential to use an image upscaler. An Image upscaler will fill in gaps left by lower-megapixel cameras and provide high-resolution indoor photos that are ready for print.
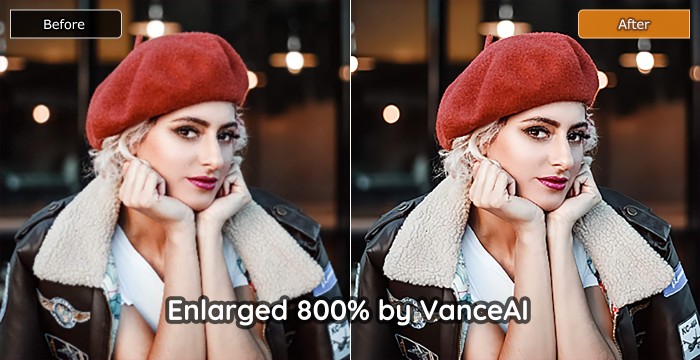
Upscale Indoor Photograph Without Quality Loss
The first problem that arises when you try to upscale an image is a loss of resolution. When we upsize an image, there are two main issues:
(1) Our image can become blocky and pixelated.
(2) We can end up with compression artifacts in our photo.
The first issue is a problem with quality, and it also makes it difficult to edit or retouch your photos once they are enlarged. If you want to resize an image from its original size, use a tool like AI image enlarger. It will allow you to scale down or enlarge your photos without losing any detail.
Using an AI enlarge image tool of VanceAI is a great way to make your image look clearer, rich, and more detailed than ever before. VanceAI image upscaler, you have an easy-to-use interface that allows you to access numerous editing tools.
Besides, you can use VanceAI Image Enhancer to enhance image quality online and make photo hd. This tool offers straightforward instructions that anyone can follow. Here is how you can use this tool easily.

To improve the quality of your images online, go to the VanceAI website and open AI Image Upscaler tool. It will be available in the upper drop-down menu.
2. Upload Your Desired Image

After opening the tool online, now upload the image you want to enlarge or upscale online.
3. Click For Processing
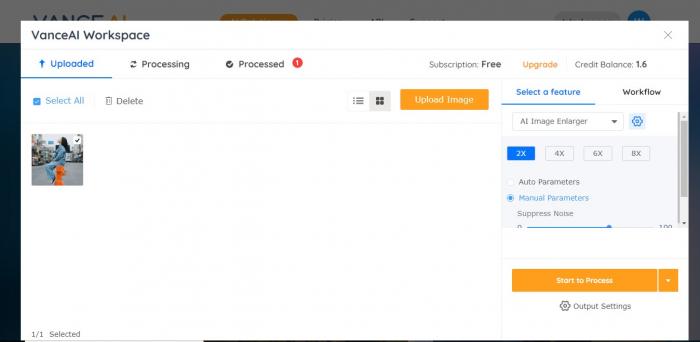
Once the image has been uploaded successfully, now click the image processing button for processing.
4. Download the Image
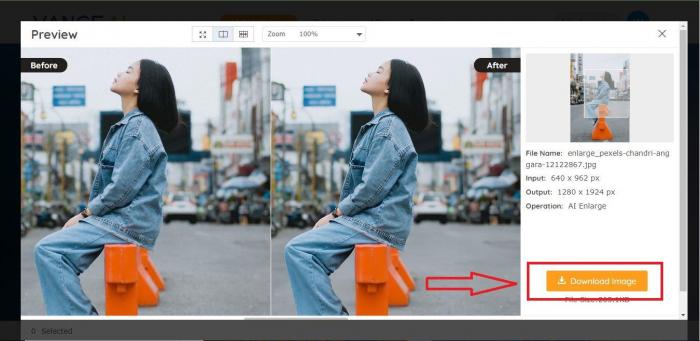
After processing the image, now it's time to download the image. Click on the download image button.
10 Tips For Shooting Great Indoor Photography
Here are ten tips to help you get started shooting indoor photography today!
1) Take Your Time

Once you've found an indoor area that you love and feel is perfect for your shoot, it's okay to take an hour to set up the shot and make adjustments until everything looks exactly how you want it.
2) Don't Worry About Inches
There's no worry about moving back and forth to capture your subject, so focus on how best to compose in front of you. (Tip: try using a long-ish lens – these create gorgeous, soft backgrounds!)
3) Find Good Light For Indoor Photography
As a photographer, light is your most essential tool. So if you can't get to an outdoor location to find great light, bring it to you! Hold a piece of white foam core or poster board behind your subject and bounce the flash off it to reflect into your scene.
4) Get Closer than Closer
There's nothing worse than a shot of a subject with very little detail because you were too far away from it. When shooting things like architecture or other man-made objects, make sure that you're getting very close so you can get a lot of detail and avoid having your photo end up looking dull and empty.
5) Get Down, Get Up, and Move Around

Once you've found a great shot, don't stay in one place. Move around, and change your angle of view. Find what might be a better perspective or find a new way to frame that perfect moment. Adding motion to your photography can make all the difference.
6) Approach People in the Old Fashioned Way
We live in an overly politically correct world where most people look away when you take their picture. If you want genuinely great indoor vintage images, you have to go back in time. It's easy to throw on a suit, find a good spot, set up your lights, and start shooting people as they walk by.
7) Use The Right Lens For Indoor Photography
A 50mm f/1.8 or f/1.4 will work great for portraits and give your photos a dreamy look as though they were shot using a Holga camera (the poor man's Leica). If you want more of an action shot, try using a telephoto lens like 70-200mm.
8) Shoot Lots of films (Or Delete them Often!)
Be honest with yourself: what would you say if someone asked you why those pictures were good? If it's just about having an eye for detail, keep shooting—practice does make perfect! But if there was something technically wrong with them, don't save or print those images. Delete and shoot again!
9) Learn to Edit Like A Pro For Indoor Photography
After taking a great photo, it's time to edit it. Photo editing software has come a long way, and what was once an excruciatingly time-consuming process can now be completed in minutes with just a few clicks of your mouse. There are many styles of vintage photography, but no matter which one you choose, these basic edits will produce classic results.
10) Keep Things Simple!
The best way to shoot vintage photography is to do so with a camera used in decades past. Many photographers will use older cameras or even their smartphones. As long as you capture good shots, there are no rules for your choice of equipment. By the way, you can use VanceAI tools to make your image with higher quality. For example, if you want to remove noise from image, VanceAI Image Denoiser will be your ideal choice.
FAQ
How to avoid shadows in indoor photography?
At all costs, you should avoid taking photos in shadowed areas. Otherwise, all your pictures will look dark and foggy. If you don't have a lot of time to play around with camera settings, stand close to a light source and snap away. This is almost guaranteed to be brighter than if you're standing right beside your subject in shadow.
Remember that even if you can only see part of your subject, snapping away might still capture some good shots.
-
Shoot with a tripod and move your subject farther away from nearby windows.
-
You may want to experiment with different shutter speeds if you shoot in low-light conditions; slower shutter speeds (1/30th or 1/15th) can capture movement indoors without getting too much blur from the camera shake.
-
Keep an eye out for reflective surfaces like mirrors or glass—they can act as great reflectors and fill up shadows.
-
A flash set at an angle to reflect off of nearby walls will also help eliminate shadows.
Make sure to keep these things in mind when setting up your shot.
Conclusion
The biggest challenge of taking indoor photographs is dealing with different light settings, so understanding shutter speed and ISO will help. While taking great pictures without any additional equipment is possible, using an online image enhancer will help tremendously. If you follow these steps and tips when taking photos indoors, you should have some fantastic images.


