Again, knowing the ABCs is not enough either – knowing the right tools is necessary to optimize the entire process. And one of those is an AI Image Upscaler. With this, any image can go from zero to “wow," both in terms of attributable quality, resolution, and details. Wondering how it works? This guide caters to that as well! With that said, this article covers some interesting and practical tips and ideas anyone can apply to improve their flash lighting photography seamlessly.
Table of contents
Simplify your workflow with image upscaler.

Imagine taking the perfect picture – only to discover that it is either too small or the quality is sub-par. So you may wonder how to make photo HD. In this case, an image upscaler can be your best friend. In essence, VanceAI Image Upscaler is essentially an online tool that helps you enhance image quality and enlarge them according to your preference. So, whether you're working with historical images or unclear stock images, this tool can be super useful. It is a very powerful enlarge image tool and can upscale your image, and enhance the quality up to 8x at zero cost. However, going beyond this to 8x and 40x comes at a meager fee of less than $10 monthly. Even for a beginner, the interface is pretty intuitive and is so easy for you to navigate.
Having said that, if you’re perhaps wondering how to use this tool, here is a quick guide.
Step 1: Upload the image you're looking to upscale. 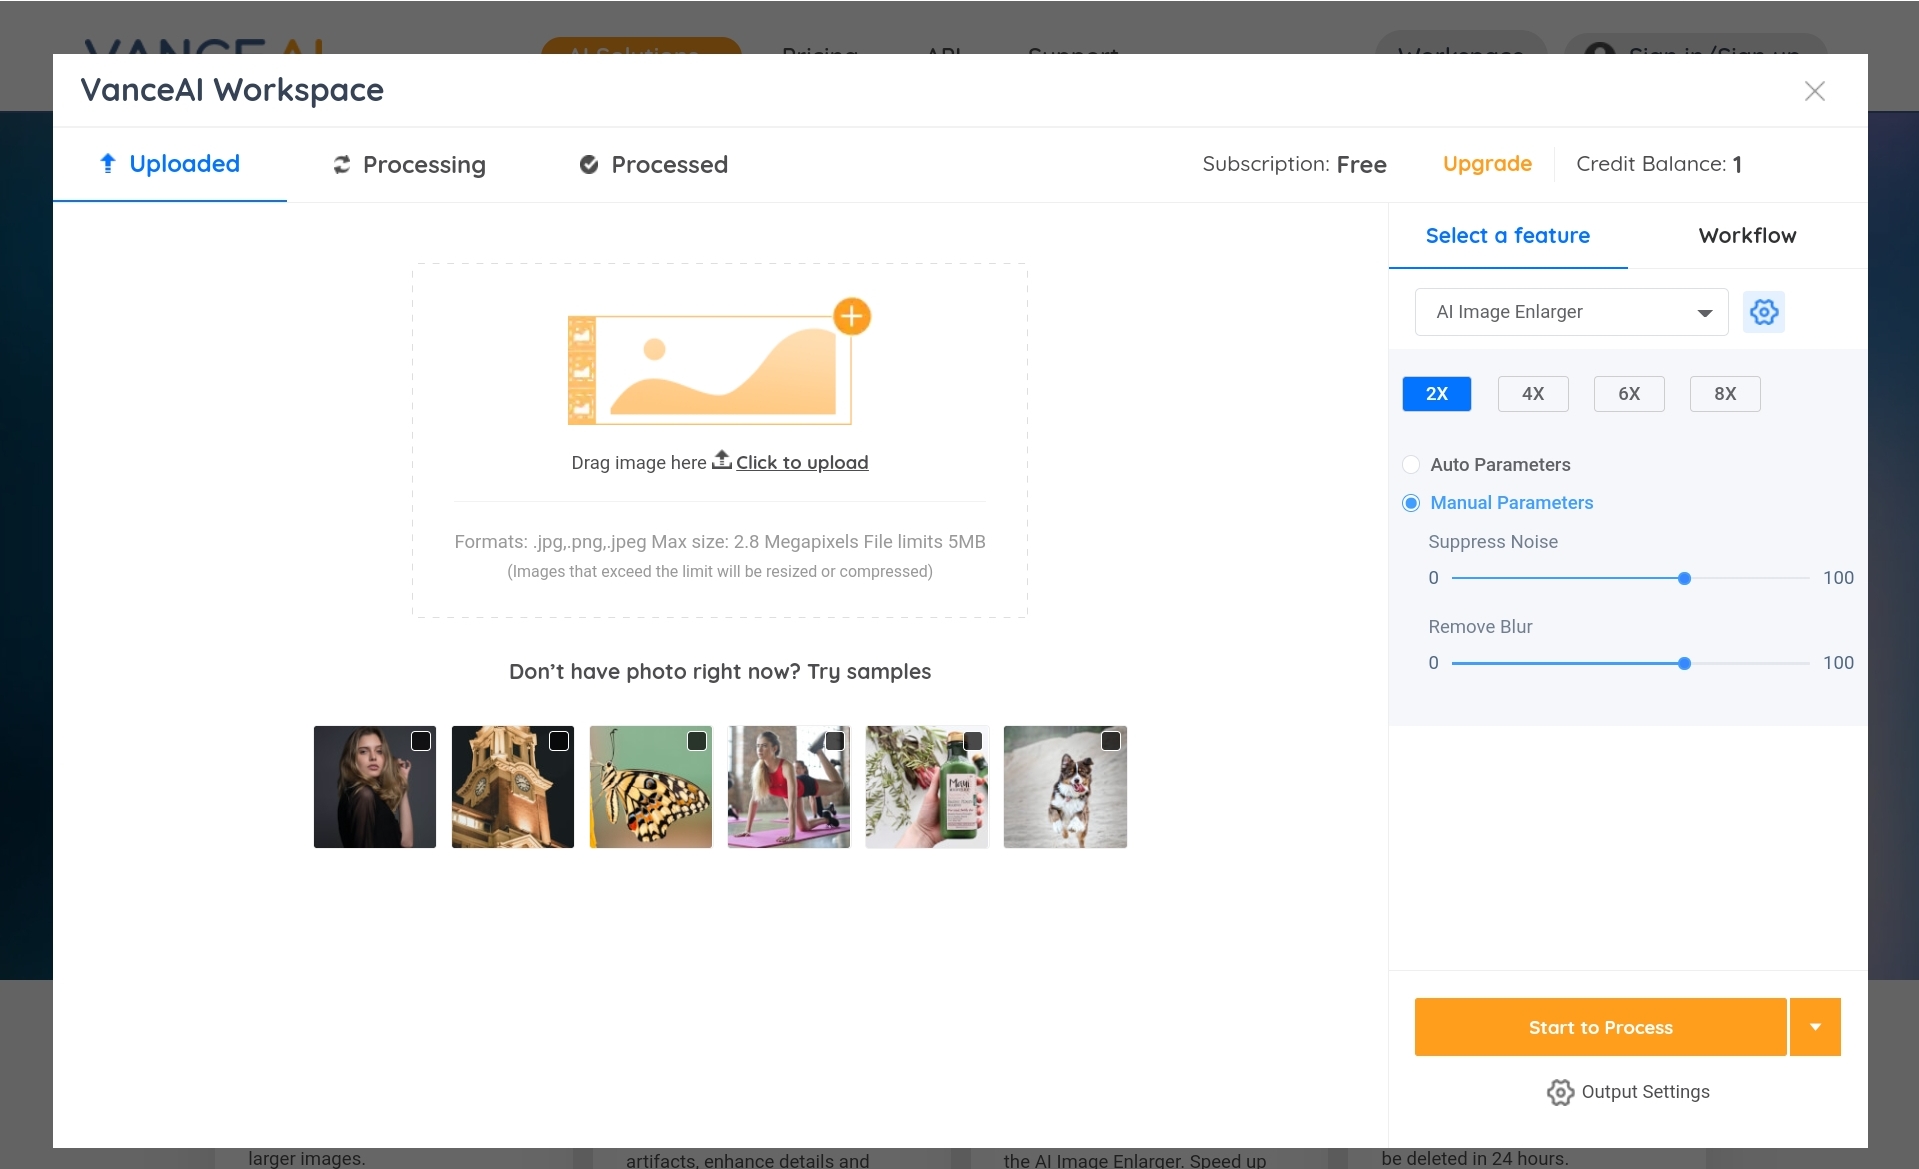
Step 2: Now, select how many times upscaling you want for the image and hit the start to process button to start processing. As mentioned before, the 8x option is available for free, while higher upscaling may come at a cost.

Step 3: wait for the process to end and download the enlarged image

Before Vs. After comparison
For a transparent analysis, take a moment to check out the letters of AI as shown in the before image. Now, compare it to the after. You may zoom both in to assess the details.
You’ll agree that the tool upscaled the image without any form of quality loss. In fact, if anything, it enhanced the quality. It made the details more apparent and as well optimized the image for a range of uses. Taking a quick zoom, it in fact made the colors pop more, kudos to the Generative Adversarial Networks leveraged. In conclusion, this tool offers a straightforward yet effective way to AI upscale image.
What is flash photography?
Flash photography involves mastering the art of using a camera’s in-built or external flash to take compelling and attractive images. Most photographers begin their career path with natural lighting. As they journey through the path and have a clearly defined style, a switch to flash photography is not uncommon. Although there is no wrong or right path between natural and flash lighting photography, understanding the latter is necessary to lead a successful photography career, even for those who define their styles as bright and airy or natural light.
How to use flash in photography?
Depending on the type of camera you own, the flash may be inbuilt or detachable. If detachable, the most straightforward approach to attaching it is to the hot shoe at your camera's top. This is to keep everything simple. Now that you’ve successfully attached it, the first things to note before using your flash are shutter speed aperture, and sync speed. While some opine that shutter speed is insignificant in flash photography, this is definitely untrue. When using a flash, be sure that your sync speed is higher than your speed so as to balance the flash lighting and ambient lighting
When using a flash, there are three settings to more – the manual mode, automatic, and through the lens. For the automatic mode, the flash sensor evaluates the lighting and tailors the intensity. Conversely, the manual mode allows you to control flash output yourself.
You can use flash lighting in almost every situation – perhaps you’re looking to get rid of shadows or you want to add an extra light source. Here you may simply place the flash just opposite the other light source you're using so it doesn't cast any shadow.
10 best tips for flash photography
1. One flash is not enough
Whether you're into outdoor flash photography or fantasy flash photography, if you're looking to get a mode 3D light effect, illuminating your subject with more than one flash is your best bet. This concept is pretty straightforward. When you use multiple flashlights, you are creating more shadows and highlights, and even in some cases, you’re introducing more rim lights into your photography. Adding these elements together, you’ll be left with beautiful output.
2. Leverage the charm of a diffuser

Another flash photography tip to take an attractive shot is diffusing the light emerging from the flash. Using a diffuser, you get to enlarge the flash area size and as such, create a less harsh and richer light. However, it is important to select a diffuser optimized for your flash coverage. If you're using Speedlight, mini softboxes can serve as excellent diffusers. A pop-up flash diffuser is also another option.
3. Understand light bouncing
As a flash photographer, always remember not to ever point the flash directly at your subject. This is of course valid for direct flash photography as well. After all, you don't want to see those annoying flat and harsh lighting on your output. So, to prevent this, bounce your flash against another reflective or refractive surface such as a ceiling, reflective card, neutral-colored surface etc. With this, you can create a more robust light source while reducing the light’s harshness before it gets to your subject.
4. Add interest with flash gels
Flash gels can help you add more color to your image. Ultimately, this can draw more attention to the subject. In fact, it can be the ideal photo post-editing tool VanceAI you’ll ever need. You can attach them to your flash while inserting a color tint to the emitted light. Besides the creative feel, it gives, this can be a great way to blend your ambient light with flashlight. Consequently, you can access a more natural image with an excellently corrected foreground color.
5. Shoot Through the lens

Through the lens or TTL mode of your flash can be a great way to shoot regardless of the ambient light conditions. When you put this on, the flash automatically communicates with the camera, assesses the present lighting, the distance between the subject and the flash, and sets the right flash intensity to get the perfect image. Whether you're shooting a night flash photography or fill flash photography, this can be a great feature to leverage, especially when used with light bouncing.
6. Use the ambient light to your advantage
In flash light photography, it is pretty easy to keep flashing your camera to get the right lighting. However, the output is not always okay. Usually, you may even over-expose the image leading to the background almost disappearing, to avoid this, blend your flash with ambient light using manual exposure. Then, tweak the camera settings in a way that exposes your background before any other elements.
7. Be careful of walls
Stating the obvious- not every wall is white. So, when you’re bouncing, the flash tends to adapt the color attributable to the wall. In essence, an orange wall will turn the light orange and blue will turn it blueish. This is even more probable when you're using a flag to direct the lightning. If you're using a flag, be sure to remove it and leverage direct light.
8. Play with the high ISO Values
With indirect flash, a lot of flash power is necessary. This is even truer when you’re using a large room. As such powerful Speedlight is advisable. However, in certain cases, this may not be enough and you may need to use higher ISO values for more ambient light. Using this, you won't get to overstress your flash nor do you have to get worried about your surroundings turning excessively dark.
9. Work with high-speed flash sync
In several cases, you tend to use your flash with a high shutter speed. However, it is important to take note of your maximum flash sync speed. Extending beyond 1/250 or 125, depending on your camera, can make a considerable section of the image black. Keeping the flash sync at the optimum level can help you cater to this. It keeps every phototrophic elements in check and optimally balanced,
10. Flash compensation strategy
In some cases where the subject's exposure is not optimal using TTL, never alter your exposure settings. Instead, leverage the flash exposure compensation technique. With this, you can analyze the amount of light the flash needs to produce to reach the optimum requirement or how much higher it is than the required. You can always find the compensation on Speedlite, usually represented as EFC.
FAQ
Why no flash photography?
- Flash photography may be utterly pointless and not usable for big events, where the flash may not reach the subject before maxing out.
- Similarly, it is not suitable for candid photography, where you’re close to the camera
- Unless for cool effects at night, flash photography is not advisable and it's easy to overexpose the images
- Flash photography tends to annoy bands and distract fans, so it's not advisable in concert photography.
Conclusion
Over the years, a common misconception about this form of photography is it is only meant to brighten nearby objects. However today, it extends beyond that. It offers a great way to not only highlights vital photographic elements but also offer you full control over your scene. By the way, if you come across some problems like the pixelated pictures, it would be a samrt choice to use AI image upsacler for fixing.