Auto-Denoise Image
Automatically denoise photo and recover real details of pictures with AI in one click, with no hard skills required.
AI Noise Reduction
Reduce image noise to give clear and crisp pictures. Picture and photo noise reduction becomes easy with Denoise AI.
Save Your Time
Save time on our noise reduction app. Simplify the workflow of picture noise reduction in seconds. All-automatic and fast.
Data Safe Guarantee
Feel safe to use VanceAI Image Denoiser. Your uploaded pictures will be deleted in 24 hours.
How to Remove Grain from Photo with AI Image Denoiser?
AI Image Denoiser helps you to make a picture less grainy quickly online in its workspace. All you need to do is follow the three steps below to get your clean denoised photos.
Upload a Picture
Click on "Denoise Image Now" to upload a grainy picture.
Remove Grain from Photo
Click on "Start to Process" and let the AI Denoiser automatically ungrain the photo.
Preview and Save
After AI grain removal, preview the picture and download the clear denoised image.
Noise & JPEG Artifacts Removal for Crystal-Clear Photos
Achieve sharp and clear photos effortlessly with Image Denoiser! This Denoise AI eliminates noise and restores lifelike details with a single click.
Whether it's cleaning up grain, noise, or JPEG artifacts, AI Denoiser simplifies the process. Powered by advanced algorithms trained on thousands of images, it ensures your photos are crisp and vivid. Experience clearer, more vibrant pictures now!
Restore Clarity: AI Denoiser Removes Grain with Precision
Bring blurry, grainy photos back to life! VanceAI uses clever denoise AI to remove grainy and recover stunning detail. Get crisp, clear results in seconds! Unlike fussy editing tools, AI turns your photos sharp and natural without tweaking settings.
Best for web designers, bloggers, and photographers. This tool is your one-stop shop for effortless noise reduction & jpeg artifact removal.
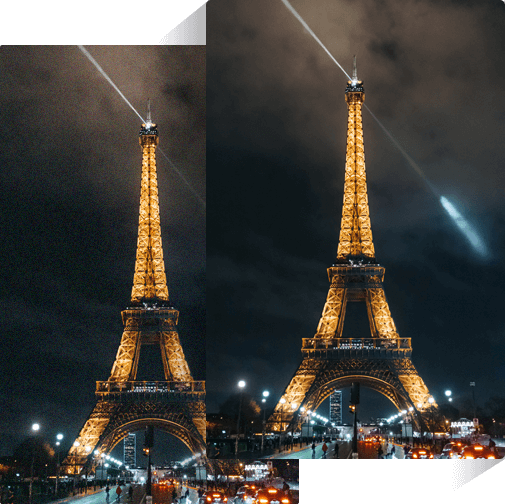
Remove Noise & JPEG Artifacts from Images: Capture Clear Stars and Skies
Tired of grainy night photos? Experience effortless night photography with the AI Image Denoiser for Windows. Say goodbye to complex settings and let the software automatically clean up your photos.
Achieving clear stars and skies in post-editing is easy now. Just upload your pictures and let AI work its magic. Also, you can further upscale images with the AI Upscaler.Get stunning nighttime pictures, hassle-free!
Get Crisp Wildlife Photos with Denoise AI
Breathe new life into your wildlife photos with Denoise AI! This AI-powered app tackles pesky noise taken under challenging lighting. Easily clean the artifacts caused by high ISO setting.
Whether you're a casual enthusiast or a pro, this tool helps you capture stunning detail – from the glint in an animal's eye to the texture of its fur. Try noise removal today and elevate your wildlife photography!
Remove Noise from Photos and Impress Followers
Want to impress on social media? VanceAI's Denoise AI can help leave a lasting impression! It cleans up noisy photos naturally, giving you crystal-clear pictures to represent better.
Common image denoisers tend to make a plastic and false portrait due to the excessive removal of facial details. The Denoise AI is different. It can smartly distinguish between unwanted noise and original skin texture. Unlike other tools that just remove everything.You can further enhance your images with the AI Image Enhancer. Let AI denoise photos and impress followers now!
1,000,000 users worldwide are using VanceAI
E-commerce platforms, photographers and journalists are using VanceAI to denoise picture.
VanceAI Image Denoiser is the best denoise software powered by AI for image noise reduction in a quick way and make photos look clearer and crisper with details preserved. - Read More.
This is the best noise reduction software to remove noise from pictures. I've been used to spending hours denoising image using Photoshop. Until I found this AI noise reduction tool, it's so easy and quick to denoise photo. Good job.
Awesome. I never expect this website could remove noise from pictures. Image noise was a headache for me. But with VanceAI Image Denoiser, all the details were handled perfectly. It's so great. The best noise reducing software I have used!
Denoise Image Online
Powerful AI noise & jpeg artifact remover. Get natural and clean results with ease. You can further enhance photos with VanceAI's tool. 100% automatically and fast!
Discover More Features on VanceAI
AI Photo Restorer
Remove scratches, spots and sepia to restore old photos.
AI Image Enhancer
Enhance more details and improve image quality instantly.
AI Image Upscaler
Upscale image by up to 800% without quality loss.
AI Image Sharpener
Turn blurry photos into clear, sharp ones with AI models.