In every photographer's life, grainy pictures come uncalled and ask to be fixed urgently. Sometimes these can turn into vintage pictures but not all the time. So, how do you fix grainy pictures? Will the quality of the picture be compromised by fixing it? It's quite simple.
Sometimes the situations get out of hand. You don't have a magic wand that removes the graininess. Your hands are tied. Of course, you might not get the same shot again and again, so removing the noisiness from the pictures is your only solution.
To fix the problem, you don't need special skills or knowledge. Just some tips that we are about to give you and a bit of patience will do the work.
With various online tools available, you can now fix your pictures with a few simple clicks. VanceAI Image Denoiser is one of those tools that come in handy to denoise images without hassle.
Table of contents
What Causes Grainy Photos?
We are not lucky all the time. Sometimes the light doesn't go in our favor or there is a higher ISO used etc. All these causes can lead to a grainy picture. Below are a few most common reasons for grainy pictures:
Low-Quality Camera
If you're using a low-quality camera, chances are your photos will be grainy. This is because low-quality cameras have lower resolution, which means they can't capture as much detail as high-quality cameras.
Low Light
Another common cause of grainy photos is low light. When there's not enough light, the camera has to use a higher ISO setting to compensate. This can result in grainy photos because the higher ISO can cause the camera to capture more noise.
Underexposure
If you don't expose your photo enough, it will also turn out grainy. This is because underexposed photos have less light, which means the camera has to use a higher ISO setting to compensate.
Poor Quality Image Sensor
Some cameras have poor-quality image sensors that are more susceptible to noise. This can cause your photos to turn out grainy.
Dirty Lens
If your camera lens is dirty, it can cause your photos to turn out grainy. This is because the dirt on the lens can interfere with the light coming into the camera, which can make the photo look grainy.
Remove Noise With AI Image Denoiser
VanceAI Image Denoiser is an AI-powered tool that can help you remove grain from photo. It offers a free trial and a paid subscription plan. The pricing depends on the number of images you want to process. The tool can be used for both personal and commercial purposes.
The tool offers a simple interface that can be used by anyone. You can simply upload the image and select the noise reduction level. The tool will automatically remove the noise from the image.
VanceAI now also launched its software version. VanceAI PC is full-featured desktop software developed by VanceAI that lets you instantly process local photos in bulk with more customization options, which will significantly simplify your workflow and boost your productivity.
How to use AI Image Denoiser for noise reduction?
Step 1
Go to the official website of VanceAI Image Denoiser and click Upload image. After clicking upload image, a new window will pop up where you can select the photo. Your selected photo will appear in a workspace like as in the picture shown below.
Step 2
After selecting the photo, you can change the parameters between auto and manual. This gives you access to the denoise of your choice. If you are new to editing such pictures and don’t understand the criteria, simply click auto parameters and the AI tool will handle the rest.
Step 3
After clicking, start to process, a new window will pop up which will show the processing sign. The processing takes less than 30 seconds and helps a busy photographer get rid of all the grainy pictures in their album. Moreover, VanceAI Image Denoiser is the only tool that lets you denoise online without asking for extra credits other than the 3 offered in the free trial. That means you can denoise one picture per credit. But if are unsatisfied and you paid for a package with less than 50 credits used, VanceAI guarantees a refund within seven days of purchase.
Step 4
After your picture is processed, a new window will open with all your previous entries. Here you can preview, edit, and download the picture as well as delete it.
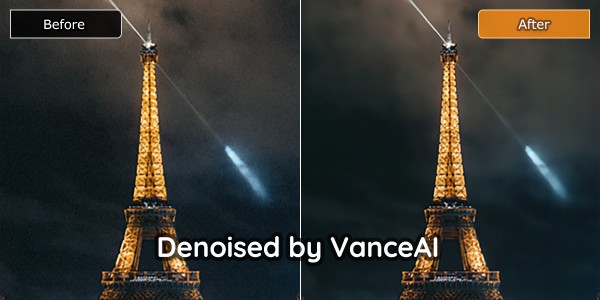
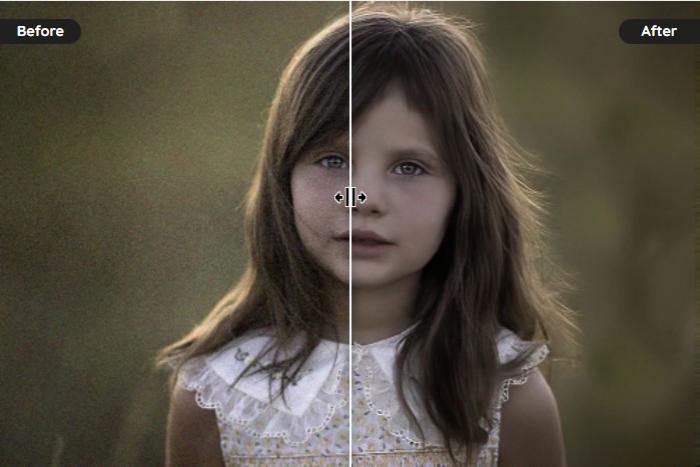
The VanceAI Image Denoiser did a great job at removing the noise from the image. The output was clear and sharp. There was no sign of any artifacts or blurring. Below image is the result of this AI tool. You can clearly see the difference between before and after denoising.
Tips For Avoiding Grainy Photos
Now that you know the most common yet avoidable reasons for grainy pictures, here are a few tips that can help you avoid this situation.
Use An Online Tool
There are many online tools available that can help you reduce the graininess of your pictures without compromising on quality. One of them includes VanceAI Image Denoiser which is considered to be one of the recommended tools for this purpose. You can easily denoise image online in the free trial without any credit card required.
Use A Tripod
This is probably the most important tip on the list. When you use a tripod, your camera is less likely to shake, and that means your photos will be less likely to turn out grainy or blurry. If you don't have a tripod, try to find something else to rest your camera on, like a table or a wall. Otherwise, you may use a tool to fix such quality issues, AI sharpen image is recommended for this purpose. You may check the video below:
Use A Lower ISO Setting
As we mentioned before, one of the main causes of grainy photos is a high ISO setting. If you use a lower ISO setting, your photos will be less likely to turn out grainy.
Use A Higher Shutter Speed
Another way to reduce photo grain is to use a higher shutter speed. This will help to freeze the action and reduce camera shake, which can cause your photos to turn out grainy.
Use A Flash
If you're taking photos in low light, using a flash can help to reduce photo grain. This is because the flash will add more light to the scene, which will help to offset the higher ISO setting.
Use A Lens With A Low Aperture
One of the best ways to reduce photo grain is to use a lens with a low aperture. This will allow more light into the camera, which will help to offset the higher ISO setting.
Conclusion
Grainy photos can be a frustrating problem but when it comes to online tools like AI Image Enhancer, all your worries can be taken care of with a simple click. Don't forget to use a tripod, this is the most effective way to reduce photo grain. Also, using a lens with a low aperture will help you get rid of the problem.
Was this article helpful?
Amaya Hamilton
Senior content writer
A passionate content writer. Mostly likes to write about technology and social media related topics. You can see more of my work over on my own blog Amaya Hamilton.