
So, for anyone looking to buy into the Facebook featured photos trend, here is a straightforward guide on how to add photos to featured photos on iPhone, Android, or any device you own. But before that, accessing the maximum benefit from this endeavor requires the utmost attention to the quality of images involved. But not to worry if the image quality is sub-par! Using an Image upscaler can ease this stress. In a nutshell, this is an AI-powered tool that helps enhance image quality and resolution. With this, getting the perfect Facebook featured photos on Facebook is now easier than ever.
What is a Featured Photo on Facebook?
Facebook added the Facebook featured photos feature a while ago. But over the years, it has consistently changed how it presents these images on your profile. As of today, it allows you to pick your dear image – announce yourself to the world – and save them.
Anytime anyone clicks the Facebook featured photos panel, they see a slideshow, which is pretty similar to Facebook stories. That is the featured photos. However, the difference between this feature and Facebook stories is that, unlike the latter, Facebook featured photos have no 24 hours expiration duration. You can have them as long as you want. Since, the feature has evolved into something like a collection, you can include more than an image, edit them, rename them, and perform several other actions as you deem fit.
Having illustrated what is featured photos on Facebook, let’s range over some practical approaches to adding them.
How to Add a Featured Photo on Facebook
For anyone looking for how to add photos to featured photos on iPhone, windows, or any device you own, here are some straightforward steps:
- Step 1: Navigate to the top right corner of the Facebook interface and click on your profile picture.
- Step 2: Locate the "See More About Yourself" section and click on the "New" button situated below it.
- Step 3: Select the photos or stories you wish to add to your profile. You can choose multiple photos and stories simultaneously.
- Step 4: Proceed to the bottom of the page and click on the "Next" button.
- Step 5: To finalize the process, click on the "Save" button located at the bottom of the page.
One-click to Make Photos Depixelated

Pixelation is one thing we strive to avoid in our pictures. But sometimes, it is inevitable. And what do you do in this case? Well, all you need is a photo enhancer to help you rectify the entire issue. One of the best options in this regard is an AI image enlarger from VanceAI. This tool is an AI-powered and full-featured online image depixelizer, ridding your image of any traces of pixelation. It leverages deep neural networks and completes everything for you automatically. Best of all, it restores even the tiniest details of your images like they never left. The tool is pretty straightforward with an interface perfect for users of various experience levels. Besides, for users that want more than what the free version offers, there is a premium version that goes for just about $9.9 monthly. If you're wondering how this works, here is a quick guide for you.
How to depixelate image with VanceAI Image Upscaler
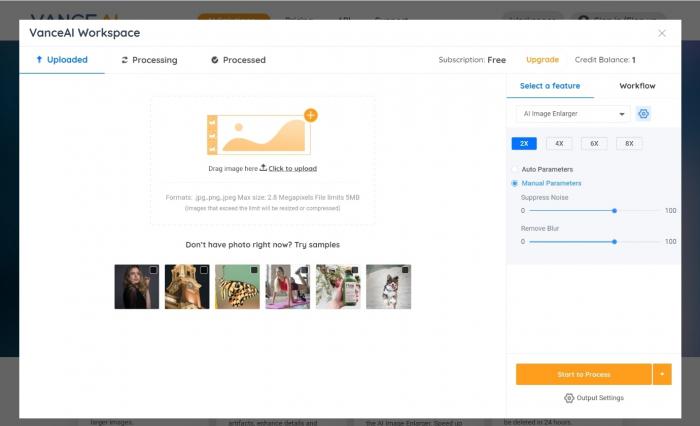
Step 1: Upload the affected image. Remember, the upscaler tool doesn’t allow you to upload more than one image at a time for free. As such, if you're looking to enhance more than one image, you may want to consider the premium plans for the batch processing feature.
Step 2: initiate the one-click depixelation by selecting the Start to Process button present at the bottom right corner of the interface. Again, note that by default, the platform sets your image to be upscaled by 2 times. But you can always choose up to 4x for free. If you need more than these, an upgrade may be required.

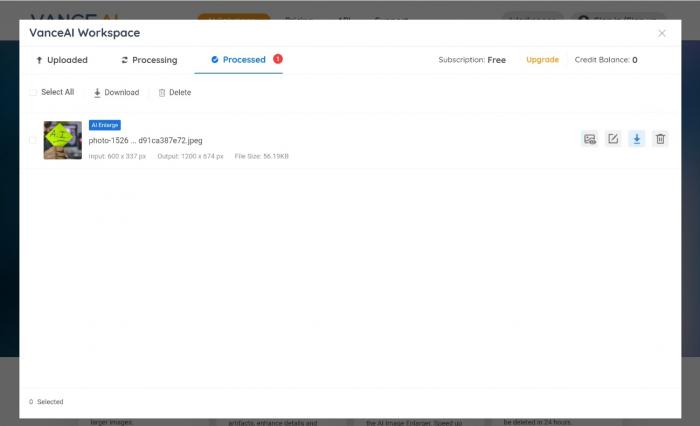
Step 3: Now, all you have to do is click the download button and save the 100% depixelated image on your device. Again, if perhaps you're looking to download the high-quality output without a watermark, logging in may be required.
Output performance
Only a handful of tools can guarantee the output this AI tool offers. Its immense ability to reconstruct missing details is very evident here. The image went right from sub-par to high quality and it does this seamlessly. If you want, you may zoom in on the images as well, and you'll agree that the difference is so glaring.
FAQ
Can someone see who viewed their featured photos on Facebook?
Yes, you can see who viewed your featured photos on Facebook. You can see the number of views it garners as well as a brief overview of the people who viewed it. To do this, first hit the Facebook featured photos collection button You’ll then see an overview of the number of people who have viewed the featured photo at the lower corner. The numbers displayed are somewhat few at first, but you can always access a complete list by selecting the arrow button.
Conclusion
Of course, we know how much of an advantage the Facebook featured photos feature has to offer. However, getting it right is another beast entirely. However, we've covered everything you need to get a compelling featured photo in this guide. Remember, throughout your journey dealing with images or photography, VanceAI suite of tools is definitely one you want to want in your corner.