How To Turn A Drawing Into A GIF?
We all want to add some entertainment to our content, chats or while commenting on social media. This entity makes chatting super fun and helps you get ease of mind after a hectic day.
Some AI photo enhancer lets you improve the quality of the pictures, so you can turn drawing into GIF without any problem. No matter what you use it for, turn drawing into GIF easily. Only some simple steps you need to follow, and anyone can handle this easily!
Table of Contents
-
Get Drawings From Photos With VansPortrait
-
How To Turn A Drawing Into A GIF?
-
Conclusion
Some Popular Tools With Nice Fuctions
Adobe: With Professional AI-Powered Function To Turn a Drawing into a GIF
Adobe, believe that most of you are already familiar with it: with the long history of video editing process, Adobe has been a leader in this field for a long time. The latest innovations, such as the Firefly Image 2 Model and Super Resolution, demonstrate the reputation of Adobe: precision and versatility. If you want the most powerful functions and the best results, Well, Adobe is abosultly your first choice. However, it may not suit someone who wants to enhance your photo or turn into GIFs just for fun. Adobe is more like a weapon for professional workers.
Advantages
-
Unmatched Quality
-
Customization
-
Ecosystem Integration
Disadvantages
-
Steep Learning Curve
-
Cost
-
Hardware Demands
-
Umatched Quality: As the leader of photos editing tools, Adobe offers the highest quality, including for commercial projects or print media. While turning into a GIF, Firefly Image 2 can boost resolution by up to 30% in raw files, preserving intricate details like fabric textures or architectural lines.
-
Customization: Adobe allows users to adjust their work, professionals retain full control over parameters, which enables the AI to generate works that can align with your creative visions.
-
Ecosystem Integration: We all know that Adobe have a wide range of creative Cloud (e.g.Premiere Pro, After Effects) , using Adobe can match streamlines workflows for multimedia projects.
-
Steep Learning Curve: Mastery of Photoshop or Lightroom requires users to have technical expertise, which makes it less accessible to casual users and normal people.
-
Cost: Well, how much you pay decides the quality right? Accompanied by high-quality results and powerful functions, Adobe's pricing is also far ahead. Basically, it is more expensive than other software tools.
-
Hardware Dmands: Processing high-resolution files demands powerful GPUs and RAM, limiting usability on older devices.
Canva: Streamlined AI Enhancement for Everyday Users
Canva, another most popular tool, which positions itself as a user-friendly design platform, suit for nomal people and its Enhancer and PixelPerfect, which allows to non-experts seeking quick fixes for social media or marketing content. If you don't require perfect quality and want a cheaper price, maybe you should try it! Suit for user who want to turning into GIFs in daily use.
Advantages
-
Ease of Use
-
Affordability
-
Cross-Platform Accessibility
Disadvantages
-
Limited Precision
-
Output Restrictions
-
Generic Styling
-
Ease of Use: While Canva aim on daily use, it offers user-friendly interface, drag-and-drop functionality and prebuilt templates, all of these support users to achieve nice results in minutes, even without design experience.
-
Affordability: The free version offers basic function to turn a drawing into a GIF, Well, actually if you don't need too much functions, free version is already meets with your requirement. While Canva Pro ($11.99/month) unlocks advanced tools and a vast media library, it's still cheaper!
-
Cross-Platform Accessibility: Canva allows user to use it on different platforms, whether you are using computer or smartphone. Canva also support enables real-time collaboration, perfect for teams managing social media campaigns.
-
Limited Precision: Because Canva using automated adjustments, including lack the details needed for complex edits, removing fine artifacts and reconstructing heavily damaged images.
-
Output Restrictions: For the free version, you have to stand with some disadvantages, like users face resolution caps, sometimes your GIF are losing details, small mistakes while turning into GIFs.
-
Generic Styling: Canva most depend on AI-powered works, and AI-generated templates may lack uniqueness, you can't adjust too much, need to risk repetitive designs in competitive markets.
Get Drawings From Photos With VansPortrait
Are you looking for some tools to add a creative touch to your photos?
VansPortrait, which is an online tool using AI to convert photo to line drawing, with only thing you need to do it's click the button, and then you'll get a beautiful, unique images, that are worth for both sharing on social media or using as desktop wallpaper. Best of all, VansPortrait comes with three free credits so you can enhance quality before you turn drawing into 3D GIF.
It has a quick and easy interface. You might just find yourself hooked on this addictive new way of creating art. Here’s how you can do it. Besides that, more people also seem to be interested in AI Face Generator. You can know more from the link.
There are two important functions. First is the ability to transform some pictures into other styles (such as sketch style or anime style), which offers you much more creativity and interest during photo editing. The other advantage is that it can enhance the image quality of some unclear GIF images. Change it into a clearer version, really helpful.
Step 1
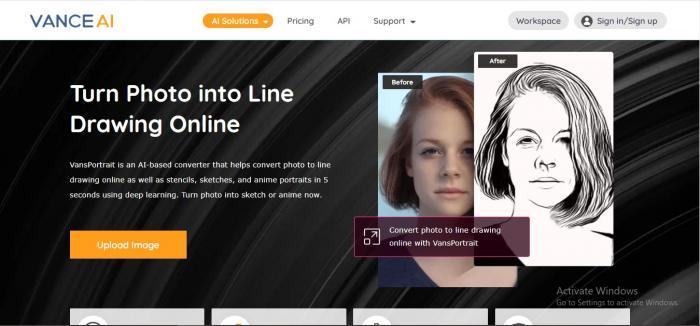
After launching the top trending photo enhancer feature, VanceAI is back with VansPortrait. This feature lets you turn photo into line drawing. All you have to do is go to the official website of VanceAI and click on upload image.
Step 2
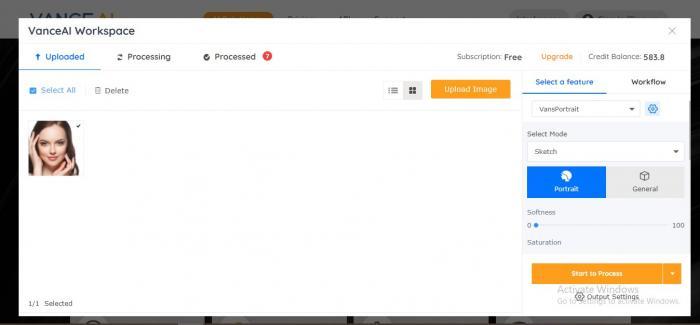
After selecting the image, the following workspace will open upon your screen. Here you can select two different features like Sketch or Anime. If you cannot decide the setting yourself, let the AI-powered tool handle everything for you. Simply click on Portrait or General and click on ‘Start to Process.’
This workspace also includes all the uploaded pictures. In paid version, you can upload as many pictures as you want. Once you click on ‘Start to Process,’ all these selected pictures will come up with results. More interestingly, there are also some popular Vtuber Maker which use similar technology. Try it if you like.
Step 3
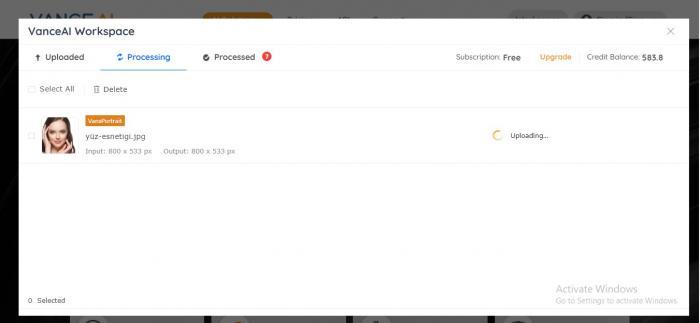
The best thing about this tool is the processing time. It takes less than a minute to process the uploaded picture. Not only it saves you from spending too much time on each picture, you can quickly end all your projects in minimum time spend. Besides that, you can also view which pictures are processing and which aren’t.
Step 4
After the processing has completed, the following workspace will pop-up. All the previously edited pictures from different features as well as the current ones will show on here. The output can be downloaded as a PNG or JPG file. You can also re-edit as per your requirements and view processed photos into different angles. Apart from that, there comes some fancy AI Portrait Generator, making fancy selfies at a fast speed. Get to know more about it. In another way, trying cartoon styles by using an AI cartoon generator is also a great idea.
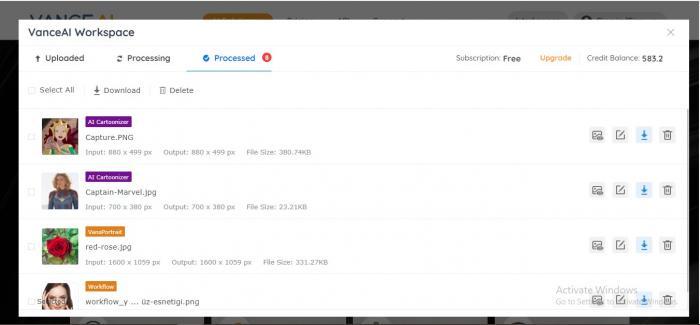
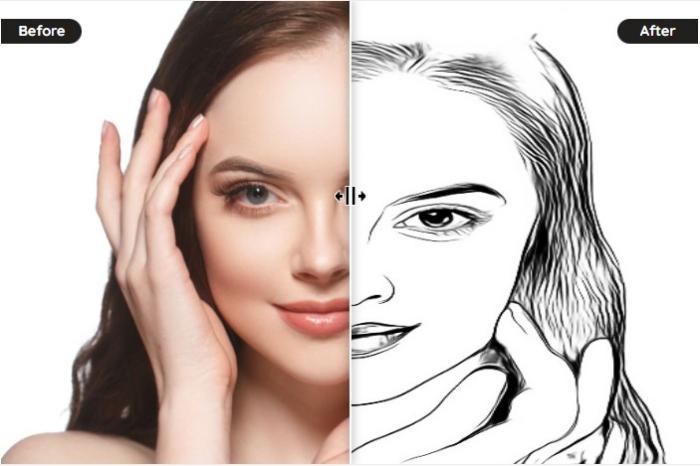
VansPortrait is a new online tool that allows users to convert their photos into line drawings before you can turn drawing into GIF. With a user-friendly interface and high-quality results, VansPortrait is absolutly a nice tool for you, just visit VanceAI website and upload a photo, then selecting the desired quality of details for the line drawing.
For someone who wants to generate unique illustrations or improve the skills of photo editing, VansPortrait will be your TOP choice. With the high quality of output and simple steps to operate, whether you are a rookie or a master of photo editing, VansPortrait all meets your need for converting photos into line drawings.
Now, VanceAI also launches its software version. VanceAI PC is full-featured desktop software developed by VanceAI that lets you instantly process local photos in bulk with more customization options, which will significantly simplify your workflow and boost your productivity. Free Download
How To Turn A Drawing Into A GIF?
Brush.Ninja is an online tool that enables users to turn drawing into GIFs. There didn't have too much difficult process, just select a frame rate to render the drawing into an animated GIF. You can also share your resulting GIF on social media or download it for offline viewing.
This too works well for creating short, shareable animations. If you are still bothered by how to turn a hand drawing into a pdf or gif, just have a try! The service is web-based and can be used on any device, without downloading any applications or software. If you’re looking for a way to add some flair to your online communication, here’s how to turn a drawing into a gif with Brush.ninja.
Step 1
Go to the official website of Brush.ninja. This website has the easiest interface and quick response to help turn drawing into GIF. The website will not take you from one page to another. The workspace area will appear on the front with different features around it.
Step 2
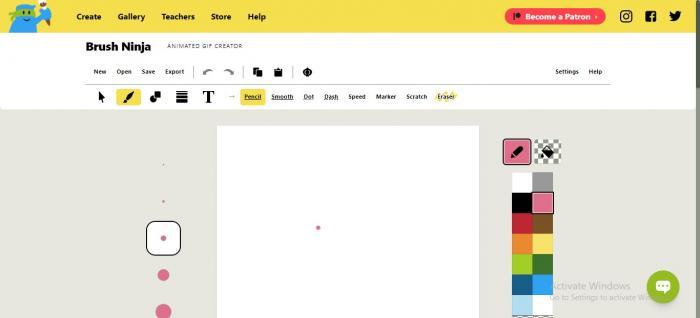
Next, click on the arrow button to select, rotate or move the picture. Beside it is the brush icon through which you can choose paint brushes. Alongside it, there are shapes and stickers, lines and text icons. You can also change the shape of your brush which can be pencil, smooth, dot, dash, speed, marker and scratch. If you make a mistake while drawing, use eraser to remove excess if you want to turn paper drawing into GIF.

Step 3
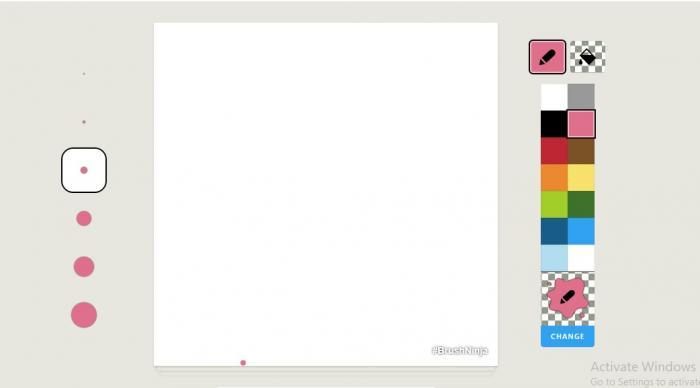
Below that tab, there is workspace area. You can choose the thickness of the tool that you will be using to draw with. Colors are of prime importance, you can select the shade for your drawing. If you don’t find the color, you can always click on the left bottom corner button named as ‘Change.’
Another great option is the filling picture. Above the color toggle bar, there are two options. One is pencil and the second is filler. If you don’t want to fill the space after drawing, simply choose pencil. But if you do, choose color filler. This option lets you fill shapes while drawing.
Step 4
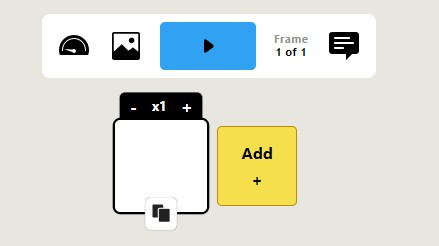
Below the workspace area is actually the most important part. Here, you can choose the pictures to render and images per frame. Next, you can also select the speed per picture and upload from your computer. The best part is that you can always write captions on each picture and it wouldn’t affect the quality after you turn drawing into GIF.
Conclusion
So there you have it!
Convert photo to line drawing which is not as hard as it seems. You just need the right tools and some patience. Have fun with it and see what creative things you can come up with. Once you’ve got a few GIFs under your belt, be sure to share them in the comments below or on social media pages. Photo to line drawing is one of the best tools to use for converting photos into line drawing, so you can easily turn line drawings into GIFs.
