Get to know VanceAI Image Enhancer with a quick review, including a step-by-step how-to guide and tips on using it to make your images look better. Let’s begin!
What can you do with AI Image Enhancer?
Imagine having a tool that could turn blurry, low-quality images into crisp, stunning visuals. That's the power of AI Image Enhancer.
Our cutting-edge technology uses artificial intelligence to analyze and enhance images, bringing out the best details and colors.
AI Image Enhancer can help you create stunning visuals that will capture attention and leave a lasting impression.
How to use VanceAI Image Enhancer?
Step 1: Go to VanceAI Photo Enhancer workspace.
No matter what page of VanceAI you are on, you can easily find VanceAI Image Enhancer on the navigation bar. Just move your mouse to "Product" and click "AI Photo Enhancer" on the drop-down bar.
Step 2: Upload your image
Once you access AI Image Enhancer, simply drop your image onto the banner or click "Upload image" to select the image you want to enhance. This will lead you to VanceAI Enhancer Workspace, in which you are able to apply AI upscaling, sharpening, and denoising to your image.

Or, you may simply move to "Workspace" on the navigation bar and select "AI photo enhancer" to access the workspace and upload your photos in the workspace.
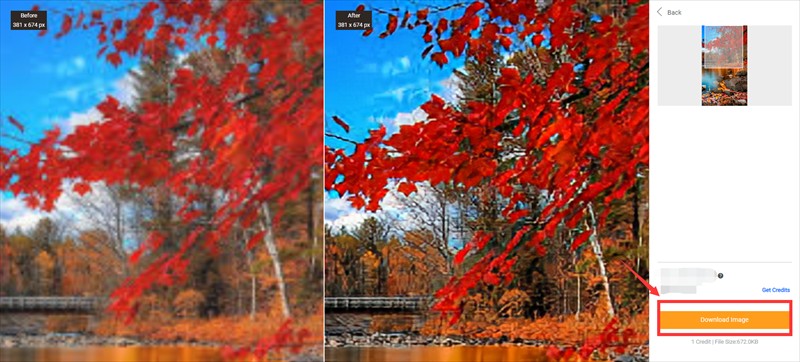
Step 3: Preview and download the result.
Hit on "Start to Process" to let AI analyze and fix your problem with images. After a few seconds, the result will appear on the left box paralleling the original image to let you see improvement intuitively. Download the result and save it to your own device if you are satisfied.
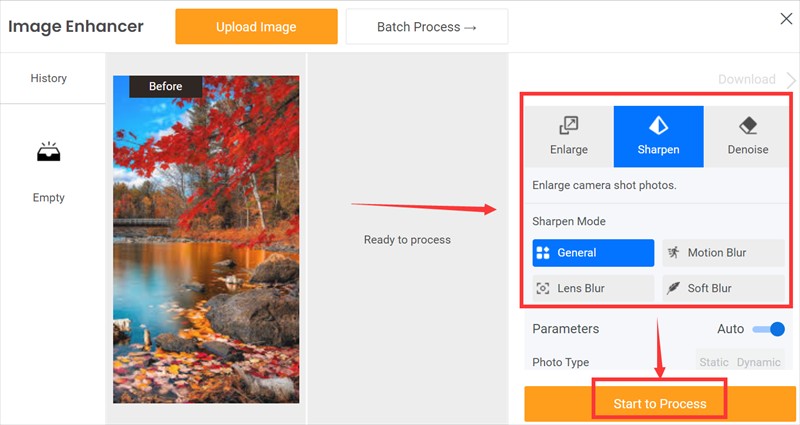
Note: The default parameters can meet all your general requirements for image quality. If you have higher demands for clarity or resolution, just drag the value bar or you can use other tool to make photo hd.
Product Recommendations for Further Editing
If you are still waiting for the improvement results of VanceAI Image Enhancer, you can try other efficiency tools of VanceAI. These tools often focus on improving a certain aspect and can provide improved effects for dissatisfaction with individual details. The following is a brief introduction to these products.
VanceAI Image Sharpener
When you think that the defect of the output result is that the definition of the outline is still not up to your expectation, you can choose to sharpen it separately to improve the line feeling of the outline. AI Image Sharpener helps clear the blurry line in one click with various modes available to fix out-of-focus images, remove motion blur, and smooth edges online while highlighting the details.
VanceAI Image Upscaler
When you are not satisfied with the output photo as a whole, you can also choose a detail you like in the picture and zoom in, but zooming in often means that the clarity will be greatly reduced. At this time, AI Image Upscaler can be your little helper. It uses the AI algorithm to enlarge the local details and under the original definition, you can choose the clear multiple by yourself.
Popular Posts