
Tired of skin blemishes popping up in your photos despite taking the necessary precautions? Skin blemishes can be a major pain to take care of, but with the help of the right tools, they can be easily removed from photos.
Using the power of deep learning, VanceAI can help you remove skin blemishes from your photos. This guide will teach you how to remove skin blemishes from digital photos using a few different methods. Let’s go over the steps for removing skin blemishes from a photo using VANCEAI!
VanceAI PC is full-featured desktop software developed by VanceAI that lets you instantly process local photos in bulk with more customization options, which will significantly simplify your workflow and boost your productivity. Free Download
What are skin blemishes?
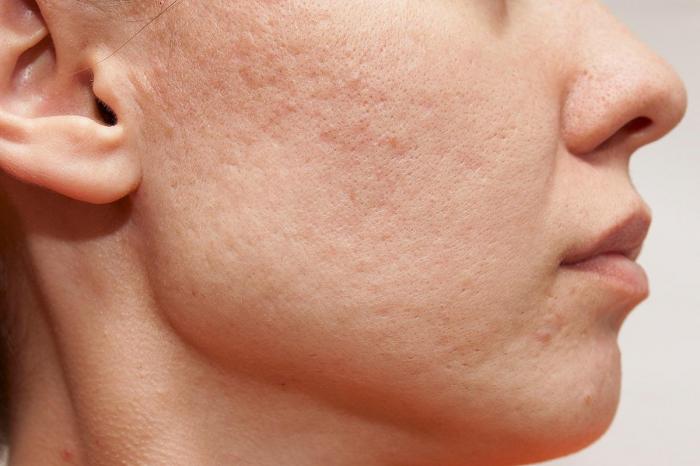
A skin blemish, also called acne or zits, is an area of skin with increased oil production and dead skin cells on its surface. This could be an open pore (blackhead) or closed comedo. Most people develop these blemishes when they reach puberty and are produced by overactive sebaceous glands.
Certain individuals may have a genetic predisposition for developing them. Pimples can occur anywhere on your body but most commonly appear on your face, neck, shoulders, back, and chest. They range in severity from small whiteheads to large cysts that can cause significant scarring if left untreated. If you are not satisfied with the result, you can use some tools to make photo hd.
What is VanceAI Portrait Retoucher?
VanceAI is a smart photo enhancer that removes skin blemishes from photos—all you have to do is upload. It even improves your selfies, removing unwanted red-eye and other photo imperfections. The technology is powered by machine learning, which means it’s getting smarter every day.
VanceAI has been designed for ease of use, with no learning curve: upload a photo and remove blemishes instantly! AI Portrait Retoucher takes out acne, dark spots, pimples, freckles, and more from any portrait. Plus it fixes common flaws in both portraits and selfies.
How to Remove Skin Blemishes from a Photo?
Removing skin blemishes from a photo can be time-consuming and frustrating, especially if you don’t have the right tools at your disposal.
Luckily, with today’s advancements in technology and artificial intelligence (AI), it’s easier than ever to remove blemishes from photo in just three simple steps. Furthermore, you don’t have to be a professional retoucher to remove blemishes and imperfections from your photos.
Step 1: Choose the photo
Before you can start removing skin blemishes, you need a picture. This part is easy: just choose your photo and upload it to the blemish remover. It could be your friend’s Facebook profile pic or even your senior portrait. It doesn’t matter as long as there are some blemishes on there that we can fix!
Step 2: Upload your photo
Go ahead and upload your photo to VANCEAI. Click Select File and select your photo, then click Upload. Now click on the start processing button.
Step 3: Let the image be processed
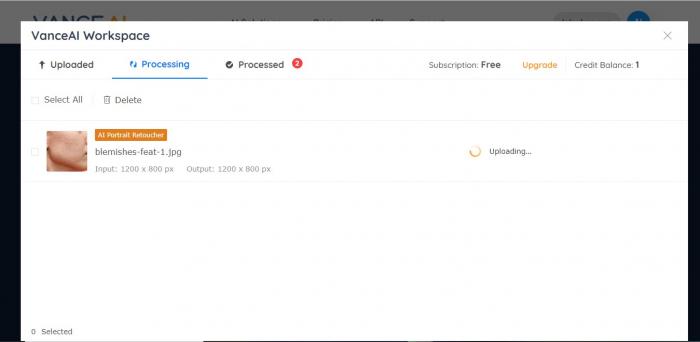
VanceAI One-Click Portrait Retoucher will take a few seconds to retouch your photo.
Step 4: Download your cleaned-up photo
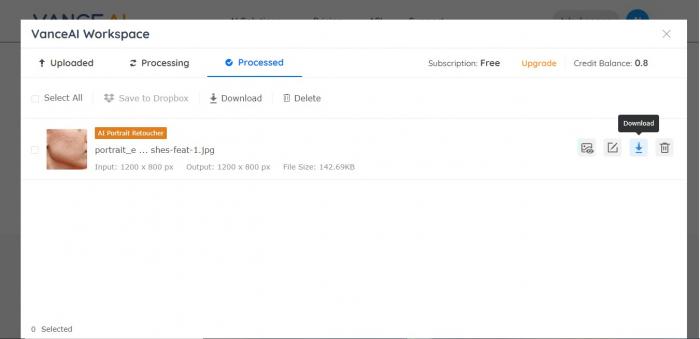
Cleaning up your photo is easy. Simply navigate to the download button. Your file will automatically download in your downloads folder as Vanceai- cleaned-up photo.
Some useful tips before retouching your photo
Before you start removing blemishes, make sure your photo is ready for editing. This includes cropping and resizing it so that it’s an appropriate size for whatever project you have in mind. Make sure that your image has enough resolution (300dpi or higher) and has been saved as a JPEG file at 72 dpi.
If you’re not familiar with what any of these terms mean, don't worry - VanceAI photo retoucher will manage everything. Finally, don’t forget to remove any unwanted background elements before starting work on skin blemishes!
Performance Review
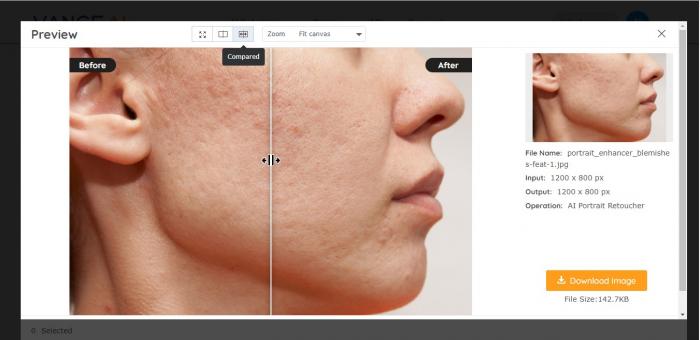
As you can see, there is a significant difference between the two sides of the photo (before and after). With VanceAI's portrait retoucher, blemishes are reduced to a minimum. Therefore, if you took a photo, but don't want to upload it due to blemishes on your face, use this tool to remove those blemishes. Once you're done, you can share your photo with confidence.
FAQS ( Frequently Asked Questions)
How To Clear Blemishes On Black Skin?
Many people tend to take flawless selfies these days, but it’s not always that easy to look your best in pictures, particularly if you have dark skin. If you struggle with blemishes on your skin and want to know how to clear up black skin from a photo, here are five useful tips to help you with that process
1. Know your goal
Before diving into your beauty project, figure out what you want to accomplish. You might want to clean up an entire photo or just remove one blemish from it. Don’t rush straight into editing before you know what your objective is—it could make your job harder than it needs to be.
2. Keep it simple
It’s easier to apply foundation or concealer when you have less on your face. Use just one product. It makes everything easier, from application to blending. For example, instead of applying foundation all over your face, focus on only where you need it most—your acne spots and problem areas.
3. Use built-in editing tools first
Most photo-editing apps now have automated tools that analyze your photo and attempt to brighten blemishes. These tools are extremely easy to use, but some require you to manually select blemished areas. Try these steps first; if they don’t work, move on to manual editing.
4. Edit with the final result in mind
You must be clear about what your final result will be. If you plan on just editing skin color and not touching lighting or tone, then start with one or two specific adjustments, like curves or color temperature. You can always go back and make more edits later.
Make sure your software allows for multiple layers so you can come back and make changes easily. Be sure to save multiple versions of your image so you have access to older versions if needed.
Conclusion
By following the simple steps outlined in this blog, you'll be able to remove skin blemishes from your photos with the help of deep learning. This technology has come a long way in recent years and is capable of doing things that were once considered impossible.
Whether you're struggling with skin blemishes yourself, or just want to remove them from images for personal use, VanceAI is the perfect tool for the job! Let us know how it went by leaving a comment below!