One-Click Enhance
Comprehensively enhance image quality, such as resolution, color, and details in one click.
HD & 4K Output
Make photo HD or 4k from 480p or smaller resolution with the best possible details and color corrections.
Automatic and Fast
Autofix pictures in less than 5 seconds by increasing image quality and resolution with advanced AI.
Data Security Guaranteed
Safe image quality enhancer. All uploaded pictures will be deleted in 24 hours once processed.
How to improve image quality online with VanceAI Image Enhancer?
Access VanceAI Image Enhancer and follow only 3 steps to improve image quality online
Upload a Picture
Click "Upload Image", select and upload a picture (jpg, png, jpeg) you want to enhance to this AI picture enhancer.
Improve Quality & Res
Click "Start to Press" and wait a few seconds. AI will finish the image enhancement process automatically, providing a preview of the enhanced image.
Download & Save
Use one click to download the HD/4K photos onto your device. You can also share the quality-enhanced photos on other social media platforms.
Boost E-commerce Sales with Enhanced High-Quality Images
AI Photo Enhancer makes it easy to make online images high-quality. Make crystal-clear product photos for Amazon, eBay, and Etsy, and skyrocket eCommerce sales. Just upload your product images and let the AI automatically increase resolution.
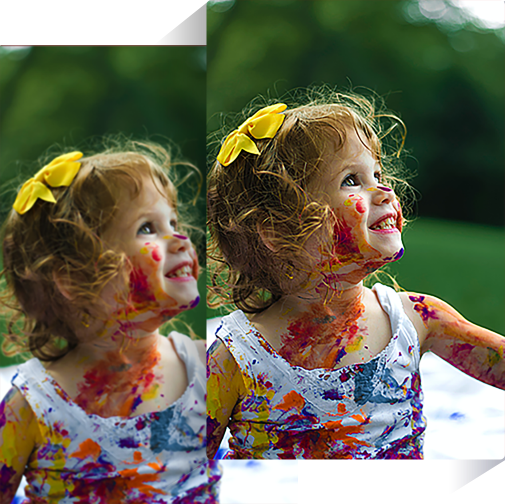
Take Your Photos to the Next Level with HD/4K Clarity
Image enhancement is easy using AI. This photo enhancer can be used for various scenarios. It can fix blurry landscapes, pixelated portrait photos, faded documents, screenshots, and more. Image Enhancer can easily bring out the details in photos and impress viewers. Also, you can further retouch faces with AI Portrait Retoucher.
Create High-Quality Real Estate Ads
AI Image Enhancer takes real estate photos to the next level. It will automatically depixelate images, sharpen details, and fix colors. AI can easily bring out stunning details and vibrant colors, making your real estate listings stand out effortlessly.
Transform blurry or low-quality real estate photos to crystal-clear quality with sharp details. Boost attraction and sales of ads with VanceAI now!
AI Restore and Enhance Old Photos with Higher Resolution
VanceAI Photo Enhancer easily enhances old photos in one click. Transform pixelated memories into crystal-clear treasures with no difficulty. Whether it's a cherished family portrait or a historical gem, unlock the hidden beauty of your old photos. Say goodbye to damage and blurry. AI helps instantly repair old photos and restore hidden details. Enhance low-resolution treasures and step back in time now!
Auto-Enhance Colors, Resolution, and Details for Sharing Online
VanceAI Image Enhancer for Windows can give clarity to pixelated images offline. Its built-in tools can instantly enhance social media photos to look high-quality. It supports previewing enhanced clarity images in real-time. Make your social media pictures sharper and clearer now!
Easily Enhance Graphic Design Images and AI Drawings
You can easily level up artwork with enhanced details and resolution. VanceAI Image Enhancer excels at enhancing digital images. It can make your digital photos rich in detail while retaining the original size. It will not affect the loading speed of your website. Simple and worry-free, one-click enhance!
1,000,000 users worldwide are using Enhance
Online shop owners, journalists for Topten.AI, and graphic designers are using VanceAI to enhance bad quality pictures
This image quality enhancer makes product pictures clear and crisp to a great extent by fixing blurs and pixelation automatically. All textures and details of my products were exhibited very well. Best photo clarity app to enhance your image!
The amazing AI enables VanceAI Image Enhancer to be the best free photo enhancer for enhancing bad quality pics and color. -- Read the full review from Topten.AI.
Very easy-to-use image enhancer that is able to enhance picture quality online visual elements, in batch. It saves me from repetitive and dull work, so I can focus on creative design.
Enhance Image Quality with VanceAI PC
Make better images with the photo enhancement app easily. Both online app and software (only for Windows) are available to help get image crisper, cleaner, and ultra HD.
VanceAI Offers More Tools for Making Image High Quality
AI Photo Restorer
Remove scratches, spots and sepia to restore old photos.
AI Image Upscaler
Upscale image by up to 800% without quality loss.
AI Make Photo HD
Make photo hd with AI while retaining the original size.
AI Image Sharpener
Turn blurry photos into clear, sharp ones with AI models.
More Posts for Enhancing Low Quality Image to High Quality