How to Make Your Animations Pop with Procreate!
Animations aren’t just for memes and annoying reactions but have several uses such as product illustrations, visual instructions, making your social media account vibrant, and illustrating your creativity.
While animations look great, users often struggle with finding the right tools for creating animations. This article will walk you through a procreate animation tutorial so you can create flawless animations every time!
What is Procreate?
The Procreate app is a game-changer for people who draw, sketch, paint or create visual art. It is an award-winning sketching, illustrating, and painting app that is exclusively designed for iPad. It allows artists to enjoy all the benefits of working digitally while recreating paper art that is usually made with pens, pencils, and paint.
Many artists who use Procreate feel that an Apple Pencil creates a similar experience as making art on paper. This feature, along with a customizable variety of Procreate brushes makes this app a favorite among commercial and fine artists.
Advantages of using Procreate
Procreate is a powerful tool that is favored by commercial and professional artists. Here are some advantages of using Procreate.
- It is easy for artists to import files from various devices
- They can organize their artwork in a gallery format.
- It allows the use of hand gestures to zoom in on artwork.
- Artists can make and undo changes easily.
- They can create an imagined picture without using traditional mediums.
- There are several customizable add-ons (pencil, brushes, etc.) that increase functionality.
- It is possible to perform professional-level compositing with the adjustment of layers.
- It offers easy integration with various apps and platforms.
How to create animation on Procreate?
With Procreate, users can create their own animation and explore the art of moving objects. In addition to that, they can also share their work instantaneously. Powerful tools such as Procreate Animation Assist, 4K, and 30-second time-lapse video allows you to make animation on Procreate easily.
Procreate Animation Assist is perfect for quick animatics sketching and making looping GIFs. This deceptively powerful animation tool brings your work to life in just a few simple steps. Procreate Onion skins simplify the animation process with handy color-coded skins that illustrate which frames are behind and which ones are ahead.
Another useful feature is “hold that frame,” which is an intelligent way of avoiding repeated frames to pause the action in animation.
Procreate Time-lapse in 4K is a great way of creating a full lossless 4K video. With Procreate, you also have the option to make your creation more shareable by compressing the size down to 1080p.
Now that we have discussed why creating an animation with Procreate is a good idea let’s dive in and find out how you can make animation with Procreate.
In this tutorial, we will learn to create an animated teacup.
Step 1: Create Group
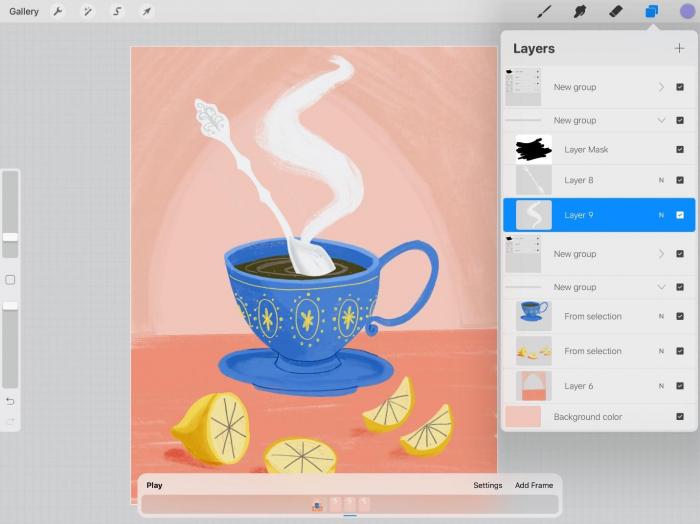
Add the items you want in your animation to their respective groups. You can have the teacup, lemons, and the background in a single group. You can create different layers for your spoon and steam.
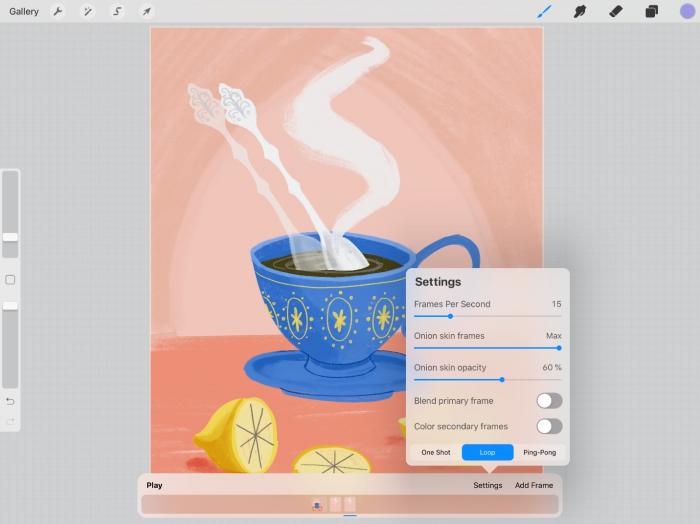
Turn on the Animation Assist in your app to bring up a timeline at the bottom.
Step 2: Set the timeline
When you tap the first frame on the timeline, you will see various frame options. Suppose you want the teacup to appear on all frames of the animation; in, that case, make it your background layer. This way, these layers will remain on screen throughout the animation.
Step 3: Animate the object

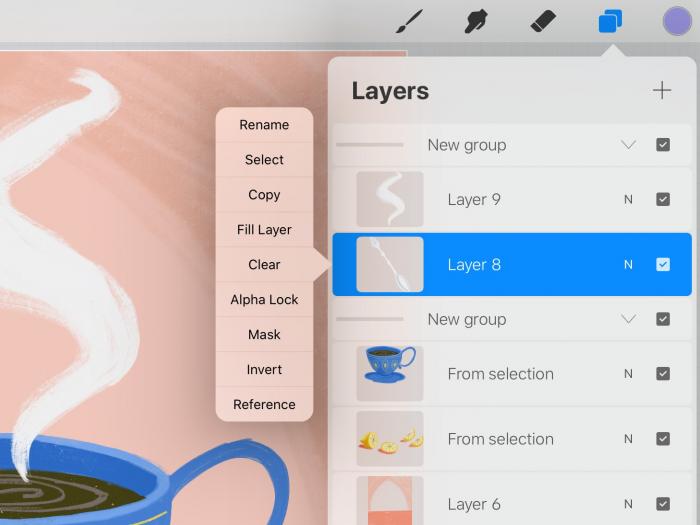
Now, you can animate the spoon to show the stirring motion. Tap on the spoon layer and select “Mask.” The Mask option is like an eraser where masking black paint hides things and white paint will make it appear.
Paint black on the mask layer where you want the spoon to be dipped into the teacup. Move on to the next frame of your animation by going back to the timeline and duplicating the spoon frame.
Step 4: Add more animation
 Move the spoon to the right to create movement. You can see onion skin in the background which acts like a tracing paper of animation. Onion skins are useful to see which frames came before the one you are creating.
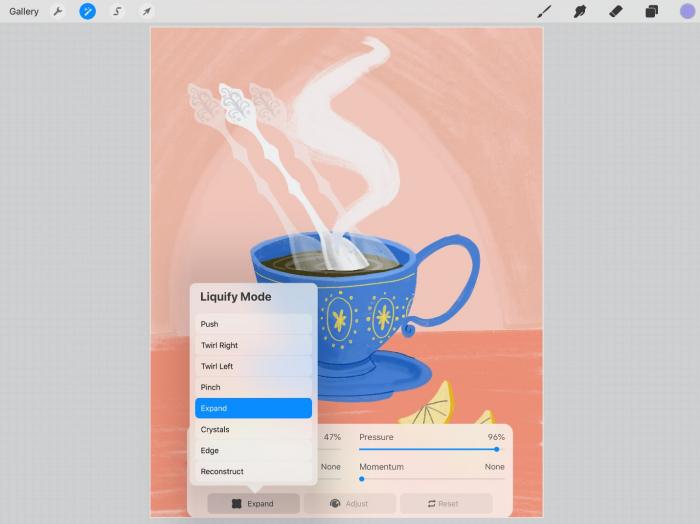
 Now you can animate the steam to make your animation truly pop. Select the layer with the steam and tap the wand icon. You can now select Liquify to reveal lots of exciting options that you can play around with.
 For this animation, we will use expand and pinch. Wherever you run your pencil, the Liquify feature will push the steam outwards.
Your animation is ready for social media flaunting!
Appreciation of animation made with Procreate
Creating animation with Procreate is easy thanks to its user-friendly interface and smart tools.
Procreate allows users to swap physical media like oils, watercolors, acrylics, etc. for an Apple pencil and screen. Its wide collection of art tools and creative features make this app well worth the money and the best part is that anyone can use it whether they are a beginner or a pro.
The app’s tools like blend mode, quick shape, layering, clipping masks, and alpha locks help add a professional touch to your work. Procreate animation features are easy to understand and use with a small learning curve, making it a favorable choice among artists.
FAQs
How to add audio to Procreate animation?
Currently, the Procreate app doesn’t allow users to add audio directly to their animation. However, there are other online audio apps that you can use to get the desired result. Simply, create your animation on Procreate and add audio to the Procreate video using an external app.
Conclusion
Creating animation can be intimidating for most beginners but with Procreate, anyone can learn to make animations. This app is beginner-friendly and relatively simple to use.Read more: Tutorial On Mirror Selfies With Best 10 Tips


