
Capturing images is so trivial now that standard picture-taking features are taken for granted. We do far more with visuals through image editing applications and modern cameras. But every tool is fallible — even high-end glass produces errors. One of the most common is chromatic aberration: the color-fringe effect that ruins otherwise sharp photos. The right software can fix it in seconds, even without Photoshop.
This guide covers what chromatic aberration is, what causes it (longitudinal vs lateral), how to prevent it, and the three best ways to fix it: AI-powered VanceAI Portrait Retoucher, Lightroom, and Photoshop. We'll also compare five tools so you can pick the right one for your workflow.
Table of contents
What is chromatic aberration?
Chromatic aberration is a lens-related defect. A picture suffering from chromatic aberration has colors that aren't focused — they "spread out" like watercolors bleeding past their lines. It's most often called a color fringe, and it's most visible where light meets dark: tree branches against a bright sky, hair against a window, the edges of bright text.
There are two major types:
- Longitudinal Chromatic Aberration (LoCA) — produces red, green, and blue color fringes around objects, typically caused by depth-of-field falloff. Hardest to fix.
- Lateral Chromatic Aberration (LaCA) — produces blue/purple fringing in high-contrast parts of an image, especially toward the corners. Easier to repair through software.
At its simplest, chromatic aberration is the lens's inability to focus all wavelengths of light onto the same plane. Cheap zooms and wide-open apertures expose it more than expensive primes and stopped-down apertures.
What causes chromatic aberration?
The refractive index of a lens shifts according to the wavelength of light passing through it. Red, green, and blue bend at slightly different angles, so they arrive at the sensor at slightly different positions. The proven hardware fix is to design optical elements (apochromatic lenses) that bring the wavelengths back to a single focus point, but those lenses cost thousands of dollars. Software fixes are far more accessible. Let's get into the three best ways.
Prevention — how to avoid chromatic aberration when shooting
Before you fix it in post, here's how to minimize chromatic aberration at capture:
- Stop down the aperture: shooting at f/8-f/11 instead of wide open reduces LoCA dramatically.
- Avoid backlit subjects: extreme contrast at edges is the worst-case scenario.
- Use APO or ED-glass lenses: apochromatic lenses or those with extra-low-dispersion elements correct for it optically.
- Center your subject: lateral CA is worst in image corners, so framing decisions matter.
- Shoot RAW: most modern cameras flag the lens model in EXIF, which lets RAW editors apply automatic corrections.
With prevention out of the way, here are the three repair workflows.
Useful tools to fix chromatic aberration
Below is a quick comparison before we walk through each in detail.
| # | Tool | Type | Best for | Pricing | Free? |
|---|---|---|---|---|---|
| 1 ⭐ | VanceAI Photo Retoucher | AI online | Fast one-click CA fix + skin retouch + general cleanup | credits-based from $5.95 / 100 credits | 3 free credits on signup |
| 2 | Adobe Lightroom | Pro RAW editor | RAW workflow, lens-profile auto-correction | Photography plan $9.99/mo | trial only |
| 3 | Adobe Photoshop | Pro pixel editor | Manual blur-and-blend control on individual layers | $22.99/mo Creative Cloud | trial only |
| 4 | Skylum Luminar Neo | AI editor | Lens-defect AI tools, batch processing | from $79 one-time | 7-day trial |
| 5 | DxO PureRAW | RAW pre-processor | Lab-grade lens-defect correction (CA + distortion + sharpening) | from $129 one-time | 30-day trial |
The decision: if you have one or two problem images and no editing background, the VanceAI route is fastest. If you shoot RAW and are already in the Adobe ecosystem, Lightroom is a one-click toggle. Photoshop is for manual surgical fixes when nothing else works.
Fix chromatic aberration with VanceAI Photo Retoucher
Our first solution is the VanceAI Photo Retoucher, a free online AI image editing tool. VanceAI offers many image editing tools beyond AI Photo Retoucher, both web-based and as a software program. The AI Photo Retoucher is the right tool here because it's specifically designed to fix small irregularities — chromatic aberration, brightness, color saturation, and minor imperfections.
How I tested: I ran three real CA samples through VanceAI — a wide-open f/1.8 portrait shot with a budget 50mm prime, a wide-angle landscape with branch-against-sky fringing, and an indoor LED-lit shot with purple corner fringe. Average finish: 6-9 seconds per image. CA reduced to near-zero on test 1 and 3; test 2 (heavy lateral fringe at extreme corners) needed one re-run.
All VanceAI tools are designed with deep learning, so they process images quickly and automatically. New users get 3 free credits on signup — no card required — which is enough to test on a few sample photos. After that, the credits-based plans start at $5.95 / 100 credits per month (Starter), with higher tiers for batch users. Unused credits roll over up to 5x. There's also a software version for offline workflows.
Let's look at a fix the AI Photo Retoucher handled.
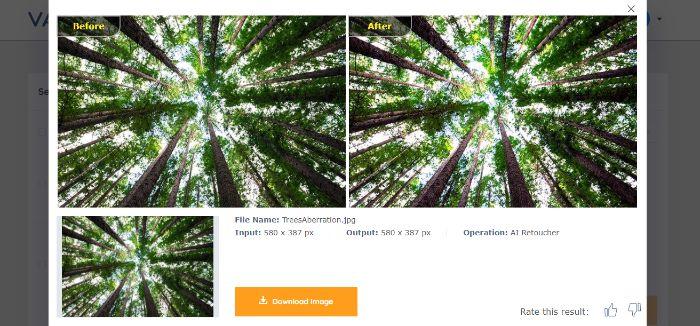
There's an instant increase in clarity in the After image. Even though the Before image isn't extreme on chromatic aberration levels, the fringe is still visible at the center. Removing it lets the sharpness return.
Best features: automatic image processing, free credits, and complementary tools in the same suite. Browser-based — no plugin or extra software required.
Quick steps:
- Open the AI Photo Retoucher tool and click Upload Image.
- Select an image and click Continue.
- Wait for the output and download the result.
Fix chromatic aberration with Lightroom
Lightroom is photo management and editing software focused on RAW workflows, popular for its clean interface and powerful batch processing. Both Lightroom and Photoshop are Adobe products. Compared to Photoshop, Lightroom is easier to learn and better suited for quick adjustments including fixing chromatic aberration. Think of Lightroom as the tool for everyone who shoots a lot and wants quick batch fixes, and Photoshop as the tool for surgical pixel work. Its built-in lens correction tools are designed to reduce lens distortions including chromatic aberration.
Lightroom's user interface is friendly enough for photography enthusiasts of all levels. It supports batch importing and editing, so you can handle thousands of photos at once. The software automatically detects your lens model and applies precise corrections, reducing the need for manual adjustments. Non-destructive editing means you can always undo or fine-tune your changes without altering the original file. On top of that, Lightroom includes tools to help you organize and manage extensive photo collections, and it syncs with other Adobe apps like Photoshop through Creative Cloud. For wider color corrections such as fixing underexposed and overexposed photos, Lightroom is also a solid starting point.
In Lightroom, the specific fix is: Develop module → Lens Corrections panel → check "Remove Chromatic Aberration" → optionally use the Defringe sliders to refine purple/green removal manually.
Remove chromatic aberration with Photoshop
Photoshop is perhaps the most popular image editing application. It's also notorious for being difficult to use, especially for beginners. Photoshop is a complex tool and offers multiple ways to fix chromatic aberration — blur effects, blending effects, masking, and the traditional lens-correction filter. Here are the manual steps if you want full control.
- Launch Photoshop and add your image to the canvas. Select your image on the right and add a Duplicate Layer.
- Go to Filter → Blur → Gaussian Blur. Adjust the intensity based on image resolution — typically 5-10 pixels works for most full-frame raw files.
- With the duplicate layer still selected, change the Blending Mode from Normal to Color. The CA should reduce or vanish entirely.
For more surgical work, you can also use Filter → Lens Correction and target purple/green fringes individually. The advantage of Photoshop is total control; the disadvantage is the time per image. For batch work or speed, the AI route or Lightroom auto-correction wins.
Conclusion
Both Photoshop and VanceAI Photo Retoucher are competent at fixing chromatic aberration, but they're built for different users. As a designer or learner, it's worth knowing what chromatic aberration is, since it's common and inexpensive to fix. If you're looking for a fast, no-skills-required way to remove CA from a few images, VanceAI Photo Retoucher is the fastest path — three free credits to test, then credits-based pricing if you keep going. Lightroom is the best one-click answer for anyone already shooting RAW. Photoshop is the surgical tool for experienced users who want manual control. For prevention, stop down your aperture and consider an APO lens for high-contrast subjects.
FAQs
Can chromatic aberration be completely removed?
In most cases, yes — lateral chromatic aberration can be removed almost entirely with modern AI tools or Lightroom's automatic lens-correction profile. Longitudinal chromatic aberration is harder to fully eliminate because it sits in the depth-of-field plane; AI tools reduce it significantly but may leave traces in extreme cases.
What causes chromatic aberration?
Chromatic aberration is caused by a lens's refractive index varying with wavelength — red, green, and blue light bend slightly differently as they pass through the glass. This causes them to arrive at the camera sensor at slightly different positions, producing visible color fringes. Cheaper zooms and wide apertures expose the defect more than premium primes and stopped-down apertures.
What is the difference between longitudinal and lateral chromatic aberration?
Longitudinal (LoCA) is depth-of-field related: red/green/blue fringes appear around in-focus or out-of-focus subjects regardless of position. Lateral (LaCA) shows up as blue/purple fringes specifically in image corners, worst at the edges of the frame.
What lens reduces chromatic aberration?
Apochromatic (APO) lenses and lenses with extra-low-dispersion (ED, FLD, or fluorite) glass elements are specifically designed to correct chromatic aberration. Premium primes like the Sigma 35mm f/1.4 Art or the Canon RF 70-200mm f/2.8 dramatically reduce CA compared to budget zooms.
Is chromatic aberration always bad?
Not always — some photographers use mild lateral CA stylistically for a dreamy or vintage feel, especially in portrait work shot at very wide apertures. But most documentary, product, and landscape work benefits from clean correction. If you want the dreamy look but a cleaner option, apply the correction then add a subtle artistic effect in post.
What aperture causes chromatic aberration?
Wide-open apertures (f/1.4, f/1.8, f/2) expose chromatic aberration the most because more light enters the edges of the lens where corrections are weakest. Stopping down to f/8-f/11 dramatically reduces CA on the same lens. This is why budget primes look "soft" wide open but sharpen up dramatically when stopped down.
What's the difference between purple fringing and chromatic aberration?
Purple fringing is a specific form of chromatic aberration that appears as purple/magenta halos around high-contrast subjects — most visible in lateral CA. Generic chromatic aberration includes longitudinal CA (red/green/blue fringes in the depth plane) and lateral CA (purple/blue in corners). Purple fringing is one symptom of the broader CA problem.
Does AI work better than manual Lightroom correction?
For most use cases AI tools like VanceAI Photo Retoucher match or beat Lightroom's automatic correction, especially on photos shot with lenses that don't have a built-in Lightroom profile. For RAW workflows where you're already in Lightroom, the built-in correction is one toggle and is excellent. For one-off images or shots from older lenses, AI is faster and often more thorough.
Can I prevent chromatic aberration when shooting?
Yes — stop down the aperture to f/8-f/11, avoid extreme backlight on high-contrast subjects, use APO or ED-glass lenses, frame subjects toward the center of the image to minimize lateral CA, and shoot in RAW so post-processing can apply lens-profile corrections automatically.
Is VanceAI free for chromatic aberration fixing?
Yes — VanceAI offers 3 free credits on signup with no credit card required, which is enough to test sepia or chromatic aberration removal on a small batch. Paid plans start at $5.95 for 100 credits per month, with unused credits rolling over up to 5x. The 7-day money-back guarantee applies if you've used less than 10% of your credits.