
There are two completely different things people call "sharpening," and confusing them is why so many videos end up looking worse, not better. The old kind — the sharpen slider in every editor — just boosts contrast along edges. The new kind — AI sharpening — reconstructs the detail that softness took away. This guide explains the real difference, why the old approach creates halos and plastic skin, and how to use an AI video sharpener like VanceAI Video Upscaler to add genuine definition without overcooking your footage.
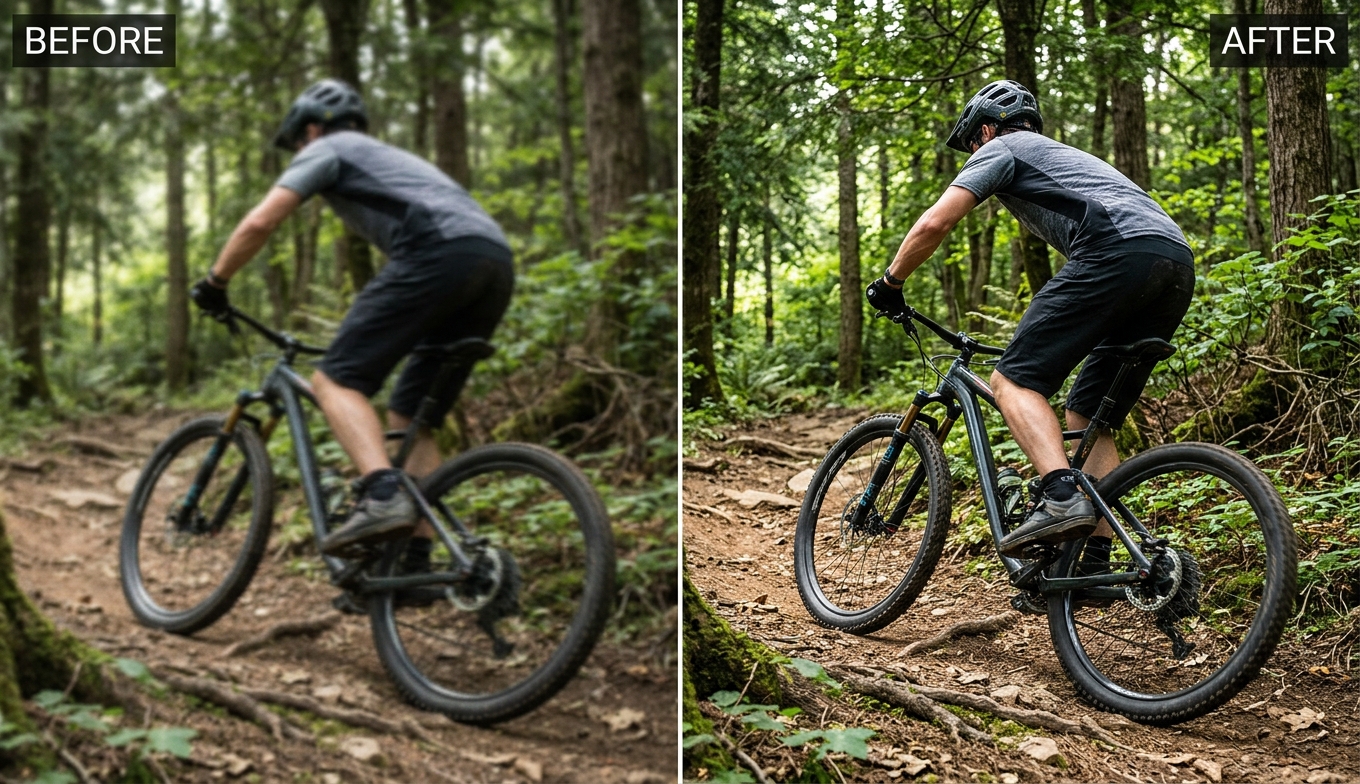
Contrast vs Reconstruction: The Difference That Decides Everything
Traditional sharpening finds edges and increases the contrast on either side of them. Your eye reads more contrast as "sharper," so a soft clip can look punchier — for a moment. But nothing was actually added. Push the slider and the trick shows itself: bright halos appear around every edge, skin turns waxy, and any grain in the footage gets crunchier. You've amplified the appearance of detail, not the detail itself.
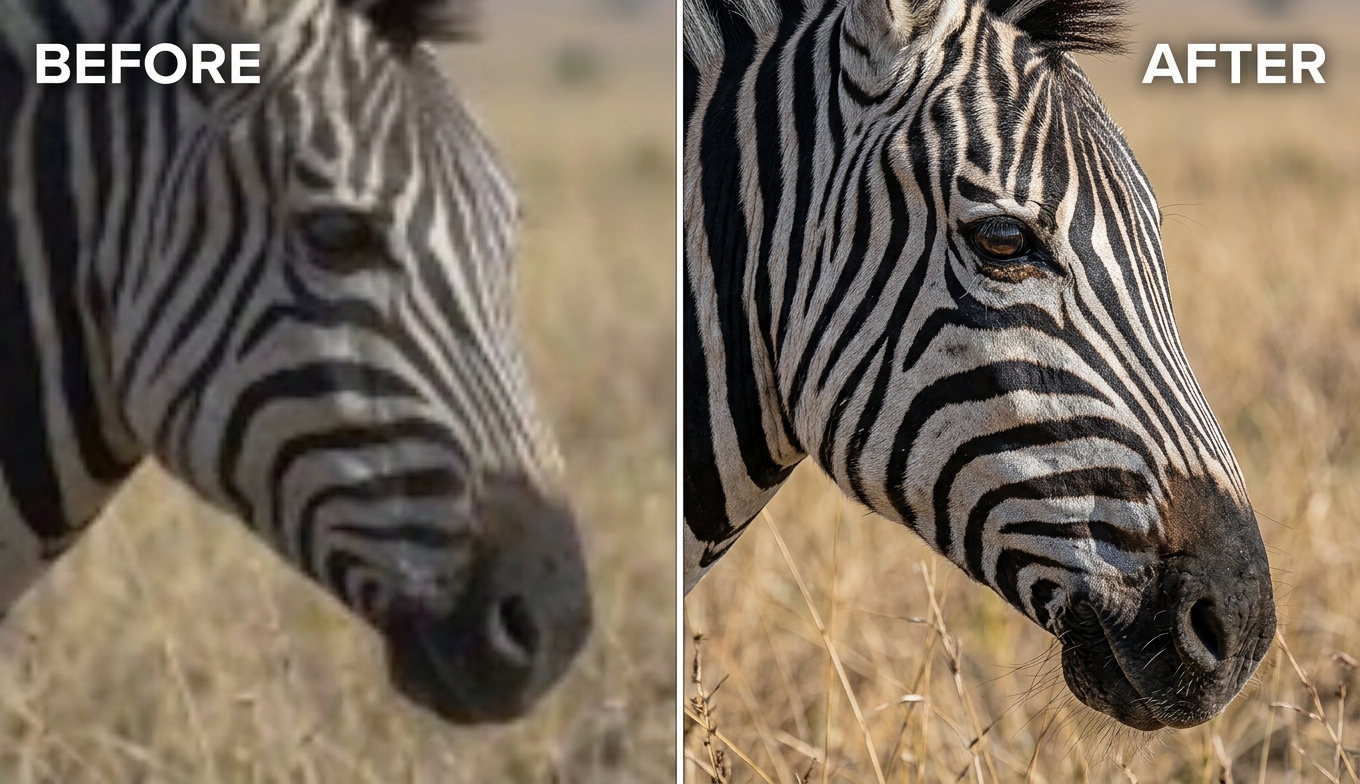
AI sharpening works from the opposite direction. A model trained on millions of paired soft and sharp frames learns what real detail looks like — the texture of hair, the weave of fabric, the edge of a letter — and rebuilds a plausible version of it. Instead of exaggerating the edges that survived, it reconstructs the ones that were lost. That's why an AI sharpener can recover a soft face or a blurred sign where a contrast slider only makes them harsher. It's also why AI sharpening pairs so naturally with upscaling: more resolution gives the model more room to place the detail it reconstructs, which is the idea behind the how to upscale video guide.
How AI Reconstruction Works, Frame by Frame
It's worth understanding what an AI sharpener is actually doing, because it explains both its power and its limits. During training, the model is shown millions of pairs: a degraded, softened frame and its sharp original. Over time it learns the statistical relationship between "blurry input" and "sharp output" for countless kinds of content — skin, hair, foliage, text, fabric, metal. When you then feed it your soft clip, it isn't guessing randomly; it's applying that learned mapping to predict the most plausible sharp version of what it sees.
Two consequences follow. First, the model is only as good as the detail it can infer — if a feature was smeared into nothing, there's no reliable signal for it to reconstruct, which is why severe blur has a ceiling. Second, video adds a dimension photos don't have: temporal consistency. A good video sharpener considers neighboring frames so the reconstructed detail stays stable from frame to frame, rather than shimmering or flickering as fine texture "pops" differently each frame. That temporal stability is a big part of why a purpose-built video tool beats running a photo sharpener on every frame.
This is also why sharpening and upscaling are two sides of the same process in modern tools. Both are super-resolution tasks — reconstructing detail that isn't explicitly in the source — so a single model that scales resolution while it rebuilds definition produces a more coherent result than bolting a sharpen pass onto a separate upscale.
Why Over-Sharpening Ruins Footage
Because contrast sharpening is so easy to overdo, it's worth knowing the three tells so you can spot them in any tool:
- Halos — bright or dark outlines tracing every edge. The giveaway that sharpening was pushed past the detail the footage can support.
- Plastic skin — faces that look waxy and over-defined, with pores and texture flattened into an unnatural smoothness.
- Amplified noise — grain that gets sharper and blotchier instead of cleaner, because sharpening treats noise as detail.
All three come from asking an edge-contrast tool to do a reconstruction job. The fix isn't a magic setting; it's using a tool that rebuilds detail and then keeping even that restrained.
Sharpening the Right Way With VanceAI
VanceAI Video Upscaler does the reconstruction kind of sharpening, which is what makes the difference on genuinely soft footage. Rather than exposing a sharpen slider to overdrive, it applies its models to rebuild detail while it upscales and denoises, so definition comes from restored texture instead of stamped-on contrast.
The choice that shapes the result is the model. Nexa handles everyday footage and, crucially for sharpening, lets you scale up to 1080p or 4K — the extra resolution is what gives reconstructed detail somewhere to live, so edges read defined rather than forced. Cineva is tuned for standard-definition sources and applies a fixed 4× upscale, which is the one to use when a clip is so soft that it's really a low-resolution problem in disguise. Because everything runs on VanceAI's servers, the quality of the sharpening doesn't hinge on your GPU — and the one-credit preview is where you catch an over-sharpened look before it reaches the whole clip.
How to Sharpen a Video Without Overcooking It
- Upload your soft MP4 or MOV to VanceAI Video Upscaler in the browser (up to 10GB, up to 4K input).
- Choose Nexa for modern footage or Cineva for a standard-definition source, then scale up — added resolution is part of the sharpening, not separate from it.
- Run the one-credit preview and judge it on the hardest surfaces: a face and a fine texture. Those reveal over-sharpening (halos, waxy skin) faster than a flat wall or sky ever will.
- If the preview looks natural, process the full clip; if it looks crunchy, the source was pushed too far — a smaller scale factor usually settles it.
- Download the MP4, which stays available for three days.
The habit that matters most is the reverse of the usual instinct: on grainy footage, clean the noise before you sharpen, so you're not sharpening the grain. Getting that order right does more for a natural result than any single setting, which is why the how to enhance video quality guide treats sequence as a rule, not an afterthought.
Sharpening Different Kinds of Footage
Sharpening isn't one-size-fits-all — what looks natural depends on the content, and the mistakes differ too.
Faces and people. The most unforgiving subject, because we're wired to notice when skin looks wrong. Aim for defined-but-natural: eyelashes and hair should gain crispness, but pores and skin texture should stay realistic, not waxy. This is where over-sharpening shows first, so judge every result on a face.
Text, graphics, and screen content. The most forgiving subject — letters and UI elements have hard, regular edges, so reconstruction has clear signal to work with. Sharpening screen recordings and slideshows usually restores readable text with little risk of an unnatural look.
Nature and fine texture. Foliage, fur, fabric, and water carry enormous fine detail, which is where AI reconstruction is most impressive — and where a contrast slider fails most obviously, since it can't invent the texture. Push a little further here than you would on a face.
Motion and action. Fast-moving footage benefits from a video sharpener's frame-to-frame awareness. Watch specifically for shimmer on moving edges in the preview; if texture flickers, ease the strength.
The Right Order: Denoise, Upscale, Then Sharpen
If you take away one workflow rule, make it this sequence. Denoise first, so sharpening doesn't amplify grain into blotches. Upscale second, so there are enough pixels to hold reconstructed detail. Sharpen last, as the final touch on a clean, higher-resolution frame. Doing it in the wrong order — sharpening a noisy, low-resolution clip — bakes in the very problems the other steps would have removed. The advantage of an all-in-one AI tool is that it applies this order internally in a single render, so you get the benefit without juggling three separate passes.
Sharpening vs Deblurring vs Upscaling
These terms get used interchangeably, but the distinction is useful. Upscaling raises resolution, adding pixels. Deblurring targets a specific degradation — motion smear or focus miss — and rebuilds the definition it destroyed. Sharpening is the broader act of increasing edge definition and micro-contrast, whether the softness came from resolution, focus, or a soft lens. In practice you rarely choose just one: a modern AI video sharpener upscales, deblurs, and sharpens together, which is why "sharpen my video" and "enhance my video" often lead to the same tool.
AI Sharpener vs Editor Sharpen Filter: A Direct Comparison
If you already have a video editor, it's fair to ask why you'd use a dedicated AI sharpener at all. This is where the contrast-versus-reconstruction difference becomes practical.
| Editor sharpen filter | AI video sharpener | |
|---|---|---|
| How it works | Boosts contrast along existing edges | Reconstructs detail learned from training |
| Adds real detail? | No — only exaggerates what's there | Yes — rebuilds plausible lost detail |
| On genuinely soft footage | Quickly produces halos | Recovers definition naturally |
| Pairs with upscaling | Separate, manual step | Built into the same pass |
| Risk of over-processing | High — easy to overdo | Lower, but still preview to be safe |
The honest summary: an editor's sharpen slider is fine for a subtle finishing touch on already-sharp footage, where you just want a hair more crispness. But for footage that's actually soft — a missed focus, a low-resolution source, a soft lens — it hits a wall fast, because it can't add detail that isn't there. An AI sharpener is the tool for rescue jobs, and it's why "just use the sharpen filter" is common advice that quietly fails on the clips people most want to fix. Use the editor for polish; use an AI sharpener for recovery.
Real-World Sharpening Scenarios
The right amount of sharpening — and the biggest risks — change with the job.
Interview and talking-head footage. All about the face, so restraint wins. A soft webcam or older-camera interview sharpens up well, but push it and skin turns waxy under the light. Sharpen for defined eyes and hair while keeping skin natural, and preview on the speaker's face before rendering the whole take.
Product and e-commerce video. Here crisp detail sells, and the subjects — fabric weave, brushed metal, packaging text — are forgiving of stronger sharpening. This is a case where AI reconstruction clearly beats a filter, because it rebuilds material texture rather than just outlining edges.
Gaming and screen capture. Often soft from a low capture bitrate and downscaling. Sharpening restores readable UI, on-screen text, and edges, and because these are hard graphic edges, the result rarely looks unnatural. Combine it with upscaling to a clean 1080p or 4K.
Archival and family footage. Old, soft, standard-definition clips are really a resolution problem, so lean on an SD-focused model that upscales while it sharpens. The goal is a clean, watchable near-HD result — restoring memories, not manufacturing detail that was never filmed.
Drone and landscape footage. Wide scenes packed with fine texture — trees, water, rock — are where AI sharpening shines and where you can be a little bolder, since there's no skin to turn plastic and plenty of real detail to reconstruct.
Across all of these, the discipline is the same: match strength to content, and let the preview on the hardest surface be the judge.
How Much Sharper Can It Really Get?
Set expectations by the source. A clip that's slightly soft — good resolution, minor focus miss — can come back looking genuinely sharp, to the point where the difference is dramatic. A moderately soft clip improves clearly but may keep a hint of its origin on close inspection. Footage that's severely blurred or extremely low-resolution improves too, but lands at "much more watchable," not "pristine," because the AI can only rebuild detail that has some basis in the original. Judge the result against where it started, run the one-credit preview to see where your clip falls on that range, and you'll never be surprised by the final render.
When Sharpening Isn't the Answer
Sometimes a clip reads as soft but the real problem is elsewhere, and sharpening it just adds artifacts. If the footage is low-resolution, the fix is upscaling first; if it's noisy from low light, it's denoising first; if it's blocky from compression, it's artifact removal. A good AI tool addresses these together, but knowing which is dominant helps you set expectations — and it's the reason a broader video quality enhancer approach often beats reaching for sharpening alone.
Frequently Asked Questions
How do I sharpen a blurry video?
Use an AI sharpener that reconstructs detail rather than just boosting edge contrast. Upload the clip to VanceAI Video Upscaler, choose Nexa or Cineva, scale up so there's room for the restored detail, and preview a face or texture to confirm the sharpening looks natural before exporting. Keep it restrained to avoid halos.
What's the difference between AI sharpening and an editor's sharpen tool?
An editor's sharpen filter increases contrast along existing edges, so it can't add detail that isn't there and it's easy to push into halos. AI sharpening reconstructs plausible detail learned from training data, so it recovers genuinely soft footage — faces, text, textures — where a contrast slider only makes them harsher.
Why does my video look worse after sharpening?
You over-sharpened. High sharpening creates bright halos around edges, a waxy plastic look on skin, and amplified noise. Dial it back, denoise before you sharpen on grainy footage, and let added resolution do part of the work — the goal is natural definition, not maximum contrast.
Does adding resolution help sharpening?
Yes. Upscaling gives an AI sharpener more pixels to place reconstructed detail into, so edges look genuinely defined instead of forced. That's why sharpening and upscaling work best together — scaling a soft 1080p clip to 4K often looks sharper than sharpening it at its original size.
Can AI sharpening fix motion blur?
Mild motion blur, yes — AI can reconstruct definition lost to light shake or movement. Severe motion blur, where detail is smeared across the frame beyond recovery, has a ceiling no tool can fully overcome. The milder the blur, the more complete the recovery.
What's the best AI video sharpener?
For most people it's VanceAI Video Upscaler: it runs in the browser, needs no powerful GPU, rebuilds real detail rather than stamping on contrast, and offers a one-credit preview to catch over-sharpening. Desktop tools offer more manual sliders, but sliders are also easier to overdo.
Will sharpening add noise to my video?
It can, if you sharpen grainy footage without denoising first — sharpening treats noise as detail and makes it blotchier. The fix is to denoise before you sharpen, which a good AI tool does in the same render, so you gain definition without the grain getting worse.
Do I need a powerful computer to sharpen video with AI?
No, if you use a cloud tool. VanceAI Video Upscaler processes on remote servers, so any laptop works. Desktop AI sharpeners run locally and lean on your GPU, which is the main reason many people prefer a browser-based option.
How do I know if I've over-sharpened?
Check a face and a fine texture, not a flat area. Over-sharpening shows as halos tracing edges, waxy over-smoothed skin, and grain that looks crunchy. If those appear in a five-second preview, reduce the scale factor or effect until faces and textures look natural.
Can I sharpen a video for free?
Yes, to start. VanceAI Video Upscaler gives new users free trial credits with no credit card, and a five-second preview costs one credit, so you can sharpen a clip and confirm it looks natural before paying. It runs online with no install.
In what order should I denoise, upscale, and sharpen?
Denoise first, upscale second, sharpen last. Cleaning noise before sharpening stops the grain from being amplified; upscaling before the final sharpen gives reconstructed detail enough pixels to live in. An all-in-one AI tool applies this order internally, so you don't have to run three separate passes.
Is AI sharpening the same as upscaling?
They overlap. Both are super-resolution tasks — reconstructing detail that isn't explicitly in the source — so modern tools do them together. Upscaling specifically raises resolution, while sharpening increases edge definition; a single AI model that does both at once produces a more coherent result than a separate sharpen pass on an upscaled clip.
Why does sharpened footage sometimes flicker or shimmer?
That happens when detail is reconstructed inconsistently from frame to frame — a risk when you sharpen each frame independently. A purpose-built video sharpener considers neighboring frames for temporal stability, so the detail stays steady during motion. If you see shimmer on moving edges in a preview, reduce the strength.
Can AI sharpening make old standard-definition video look sharp?
It can improve it significantly. Old SD footage is really a low-resolution problem, so an SD-focused model that upscales while it sharpens — like VanceAI's Cineva with its 4× scale — is the right approach. Expect a clean near-HD result rather than true 4K, since the source caps how much detail can be rebuilt.
The Verdict
Sharpening a video well comes down to one distinction: contrast versus reconstruction. Editor sharpen sliders add contrast and, pushed too far, add halos and plastic skin; AI sharpening rebuilds the detail that softness removed. VanceAI Video Upscaler does the reconstruction kind, alongside upscaling and denoising, with a preview built to catch an over-cooked result before you commit. Scale up so detail has room to land, denoise before you sharpen, judge it on a face and a texture, and let the definition come from restored detail — not from cranking an edge.