Memories never really die — they wake up at random moments. The warm, washed-out look of film photography is one of the most copied aesthetics on Instagram, TikTok, and Pinterest. This guide covers what a vintage photo actually is, 5 practical tips for the vintage look without Lightroom presets, the fastest AI workflow for refreshing real old prints, a 5-app 2026 comparison, common mistakes, and 10 FAQs covering iPhone editing, batch processing, and file formats.
Table of contents
What is a Vintage Photo?
A vintage photograph in the strict sense is one taken with an analog camera — a 35 mm film camera, an instant Polaroid, a folder camera from the 1940s. In modern usage, "vintage" also covers digital photos processed to mimic that era: faded color, slight blur, film grain, a warm cast, soft vignetting at the edges.
The reason vintage photos draw attention is exactly the same reason your grandparents' wedding album does — the imperfections (grain, color shift, soft focus) make the photo feel honest and lived-in. Modern phones produce images that are technically perfect and emotionally flat. Vintage processing adds back the imperfection on purpose.
5 Tips to Get a Vintage Look on Any Photo
The "vintage" aesthetic isn't a single recipe — it's a family of looks anchored on a few characteristics: washed-out sepia from the 1960s–70s, slight grain, lower contrast, and a warm color cast. Below are five tactics that combine to give modern digital photos that vintage feel.
1Start with Black and White
Not every vintage photo has to be black and white, but it is the easiest starting point. Black-and-white pulls out the nostalgia people associate with old prints. Apply a B&W preset from your favorite editor (Lightroom, Snapseed, VSCO, Photoshop), then layer grain and texture on top. You can stop here for a 1950s newspaper feel, or continue to step 3 to add warm tones for a 70s photo-album feel.
2Add Subtle Lens Flare
Natural lens flare is hard to capture in the wild — you need direct sun hitting the lens at the right angle, and on a phone the flare often comes out too aggressive. Most photo editors include lens-flare overlays you can drop on top with adjustable opacity. Dial it down so the flare reads as accidental sunshine, not Instagram filter. The closer to 30% opacity, the more believable it gets.
3Tweak the Colors Toward Warm and Desaturated
Film cameras almost never produced fully saturated colors — the chemistry capped what was possible. The first step toward a retro look is to drop the saturation slider 20–40% below where your phone delivers it. Then push the temperature slider warmer (toward yellow / amber). Both moves move you closer to a film-era look; over-warming pushes you toward sepia territory. On an iPhone, you can do most of this in the built-in Photos app under Edit → Saturation / Warmth.
4Add a Touch of Film Grain
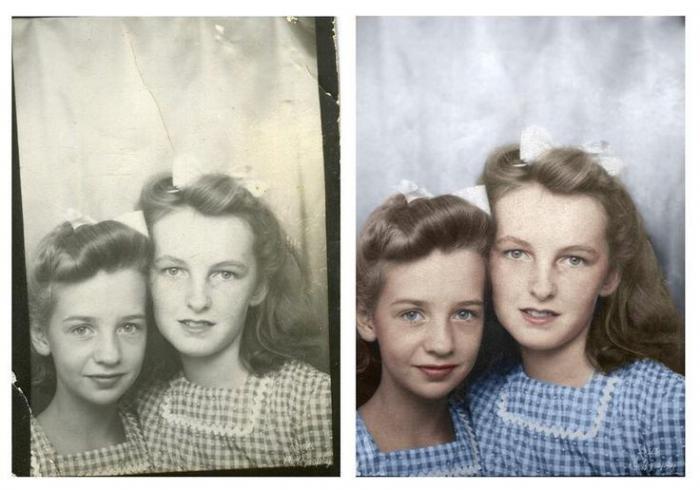
Have you noticed the gritty texture in old film photos? Real film grain comes from tiny silver-halide particles in the emulsion — a side effect of the chemistry. Modern editors replicate it with a "Grain" or "Noise" slider. Apply 10–25% film grain, not random noise; the visual is finer and more authentic. Counter-intuitively, you can also use VanceAI's AI old photo restoration to remove grain from real old photos that have too much of it.
5Layer Subtle Textures
Texture overlays — paper grain, light scratches, dust spots, faded edges — mimic the natural flaws of film. Photo editors ship with built-in texture libraries; you can also download free packs from Unsplash or Pexels. The trick is opacity: 15–30% reads as texture, anything above 50% reads as overlay. After texturing, optionally upscale photo without quality loss using a dedicated AI upscaler if you plan to print.
Refresh a Real Vintage Photo in One Click
Photographers shooting with old film cameras or scanning old prints face the same challenge: noise, faded color, scratches, dust spots. Manual cleanup in Photoshop takes 10–20 minutes per photo. Modern AI tools collapse that to under 10 seconds.
If you have a real old vintage photograph that needs refreshing rather than fake-vintaging, the workflow is:
Step 1. Choose a file from your computer or drag and drop it into VanceAI Photo Restorer.
Step 2. Click Start to Process. The AI handles scratches, fade, color cast, and minor blur in one pass.
Step 3. Download the cleaned image.
Low-light photography and high ISO are the two most common causes of grain in modern shots. Vintage scans add a third source: chemical noise from emulsion ageing. Whichever the source, VanceAI Image Denoiser handles it without needing a Photoshop license. For real old prints, VanceAI Online Photo Restorer adds scratch repair on top of denoising — scratches, fractures, stains, and blemishes can all be cleaned in seconds.
Beyond restoration, the AI Photo Colorizer is the other tool worth knowing. Instead of generic filters, it uses a deep convolutional neural network trained on millions of paired black-and-white and color photos to predict natural skin tone, clothing color, and background hues — adding realistic color to old monochrome photos without manual masking.
About VanceAI
VanceAI bundles a stack of AI image tools — restorer, colorizer, sharpener, upscaler, background remover, denoiser, cartoonizer — under a single credits-based subscription. One subscription, every tool, no per-product licensing. The free tier gives you 3 credits per month with no watermark; the paid tiers scale credits from 100/mo ($4.95) to 1,000/mo ($32.95). VanceAI also ships a downloadable PC version that lets you process local photos in bulk with more customization, which significantly simplifies workflow for photographers and archivists.
Best Apps to Make Photos Look Vintage (2026 Comparison)
If you want to try a few tools side by side before committing, here are the most-used apps for the vintage look in 2026, ranked by what they do best:
| # | App | Best for | Free tier | Starting price |
| 1 | VanceAI Photo Restorer + Colorizer ⭐ | Refreshing real old prints + colorizing | 3 credits/mo, no watermark | $4.95/mo (100 credits) |
| 2 | VSCO | Mobile film-look presets | Limited free presets | $29.99/yr |
| 3 | Adobe Lightroom | Pro grade control + presets | 7-day trial | $9.99/mo |
| 4 | Snapseed (Google) | Free quick edits | Fully free | Free |
| 5 | Hipstamatic / 1998 Cam | Native vintage camera UI | Limited free | $2.99–$4.99 one-time |
For a deeper walkthrough of the AI tool stack, see our cluster articles on restoring old pictures with the best AI picture restorer and on fixing sepia color without Photoshop — both cover adjacent surfaces of the same problem space.
Common Mistakes When Making Photos Look Vintage
Five mistakes that flatten the vintage effect:
- Over-saturating the warmth. Vintage warmth is subtle. Pushing the temperature slider past 60% turns the photo orange, not vintage.
- Too much grain. Real film grain is fine. Coarse noise looks like a bad scan, not a Polaroid.
- Hard vignettes. Real lenses vignette softly. A black ring around the edge reads as filter.
- Saturated black-and-white. Black-and-white film had range, but no saturated tones at all. Cutting saturation to zero is the right move.
- Skipping detail recovery on real old prints. If you start from a scanned old photo, restore first (remove scratches and color cast), then apply the vintage look. Skipping the restore step locks in the damage forever.
Conclusion
Don't be afraid to experiment with your camera and editor — you only learn the limits by pushing them. Making photographs look vintage for Instagram or print is straightforward once you understand the four core moves: drop saturation, warm the temperature, add a touch of grain, and finish with a soft texture overlay. For real old photos that need restoring rather than fake-vintaging, the fastest path is to run them through VanceAI Photo Restorer first and apply the vintage look on top of the cleaned base. Try the free tier on three of your photos and see which workflow fits before you commit to a paid editor.
FAQs
How to make a photo look vintage on iPhone?
You have complete control over this effect in the iPhone's built-in Photos app. The essential elements:
- Low color saturation — reduce saturation 30–40% as the first step toward an old look.
- Low contrast — drop contrast slightly and slightly raise brightness for a hazy effect.
- Grain — apply 10–25% film grain via an editor app (Photos does not include grain natively; use VSCO, Snapseed, or Lightroom Mobile).
- Warm tint — push temperature toward yellow / amber for the classic 1970s photo-album feel.
- Vignetting — add soft vignetting at the edges. Keep it subtle.
What apps make photos look vintage for free?
Snapseed (Google, free) and the free tier of VSCO both ship vintage-style filters and grain controls. For real old-photo restoration before applying vintage effects, VanceAI Photo Restorer's free tier (3 credits/mo) is the most generous.
What is the difference between vintage and retro photos?
Vintage refers to an actually old aesthetic — pre-1980s film looks, hand-developed B&W, sepia tones. Retro is a modern reinterpretation of an older style — 80s neon, 90s synth-pop colors, deliberate VHS noise. The two often overlap visually but signal different decades.
Can AI make a digital photo look like film?
Yes. VanceAI Photo Restorer and Colorizer can match the warm color cast and softness of film. For more aggressive grain and lens-flare effects, pair them with VSCO or Lightroom mobile presets after the AI pass.
Does VanceAI add a vintage filter automatically?
VanceAI is restoration-focused, not filter-focused — it makes old photos look new again rather than the other way around. To make new photos look old, pair VanceAI's output (the clean base) with a vintage preset in VSCO or Lightroom.
What size grain should I use for a vintage look?
10–25% grain is the sweet spot. Below 10% the effect is invisible at most viewing sizes. Above 30% the photo starts to look like a noisy night-mode shot rather than film.
How do I make black-and-white photos look vintage?
Drop contrast 10–15%, add 10–15% grain, push warmth slightly toward sepia (5–15% temperature shift), and add a soft vignette. That sequence converts a clean digital B&W to a 1960s look in under a minute.
Can I batch-convert photos to vintage?
VSCO and Lightroom support preset-based batch conversion. For batch restoration of real old photos before applying vintage effects, VanceAI's Standard plan ($9.95/mo for 200 credits) and above support batch uploads through the desktop companion.
Is the VanceAI desktop app free?
The desktop app is free to download. Processing still uses your VanceAI account credits — the same 3 free credits per month apply, and paid tiers unlock batch and advanced models.
What file formats work for vintage editing?
JPG, PNG, HEIC, and WebP are universally supported. For pro work, shoot or scan in RAW and convert after — RAW preserves the most tonal range for color grading.